Build Server 6 — An easier HCI?
The What
I want a whole “cloud” for myself and people around me. The services I want to host are:
- Authentik — Single Sign On and centralized accounts
- Incus — to provide VPS’s to people
- Coder — for remote development environments, but also Kali/Linux containers accessible via the browser
- Forgejo — Code forge, with CI/CD
- Nextcloud — a “cloud” with file sync, editing, and the like
- I am also considering alternatives, like OpenCloud or Cryptpad for the features I may want from nextcloud
- Element Server Suite — A complete discord alternative
- Something for Large Language Models
- Preferably with history per OIDC user
- Probably: https://artifacthub.io/packages/helm/open-webui/open-webui, see also
The Why
In my previous project, I attempted to deploy Openstack entirely with GitOps methodologies, using FluxCD.
I failed. Well, it didn’t fail, but I think I’ve spent too long on it and I need to move on.
Recently, I’ve discovered a project that simultaneously seems to be a distribution of OpenStack, Kubernetes, and Linux, called StarlingX.
Also:
StarlingX OpenStack is installed and managed as an FluxCD application.
Now, StarlingX, sadly, is not GitOps OpenStack. Configurations to the OpenStack application are done via the command line, or via helm value files. Perhaps I can clone the flux repo they use, but truthfully, I’m not going to worry about it for now.
StarlingX Attempt
There are multiple deployment guides, but I am interested in the “Simplex” install, which documents how to do an All in One install, using a single server, which is all I have.
I also care a lot about “For OpenStack only: Configure data interfaces for controller-0. Data class interfaces are vSwitch interfaces used by vSwitch to provide VM virtio vNIC connectivity to OpenStack Neutron Tenant Networks on the underlying assigned Data Network.”, since I only have one physical interface in use, and the other one will be virtual.
I started by obtaining an ISO, and attempting to install it in a virtual machine. The installer crashed becasue it wanted 500 GB of storage… which is fair I guess.At least it doesn’t crash because I don’t have enough CPU cores or ram.
Just kidding. It doesn’t boot. I don’t know why. Instead it stays stuck on “booting on hard disk”. This probably would work better on a physical machine, but I want to make sure it works on a virtual machine first.
But I install it on my physical server anyways. It doesn’t get an ip address via dhcp.
I understand why people like turnkey solutions, like ESXI now.
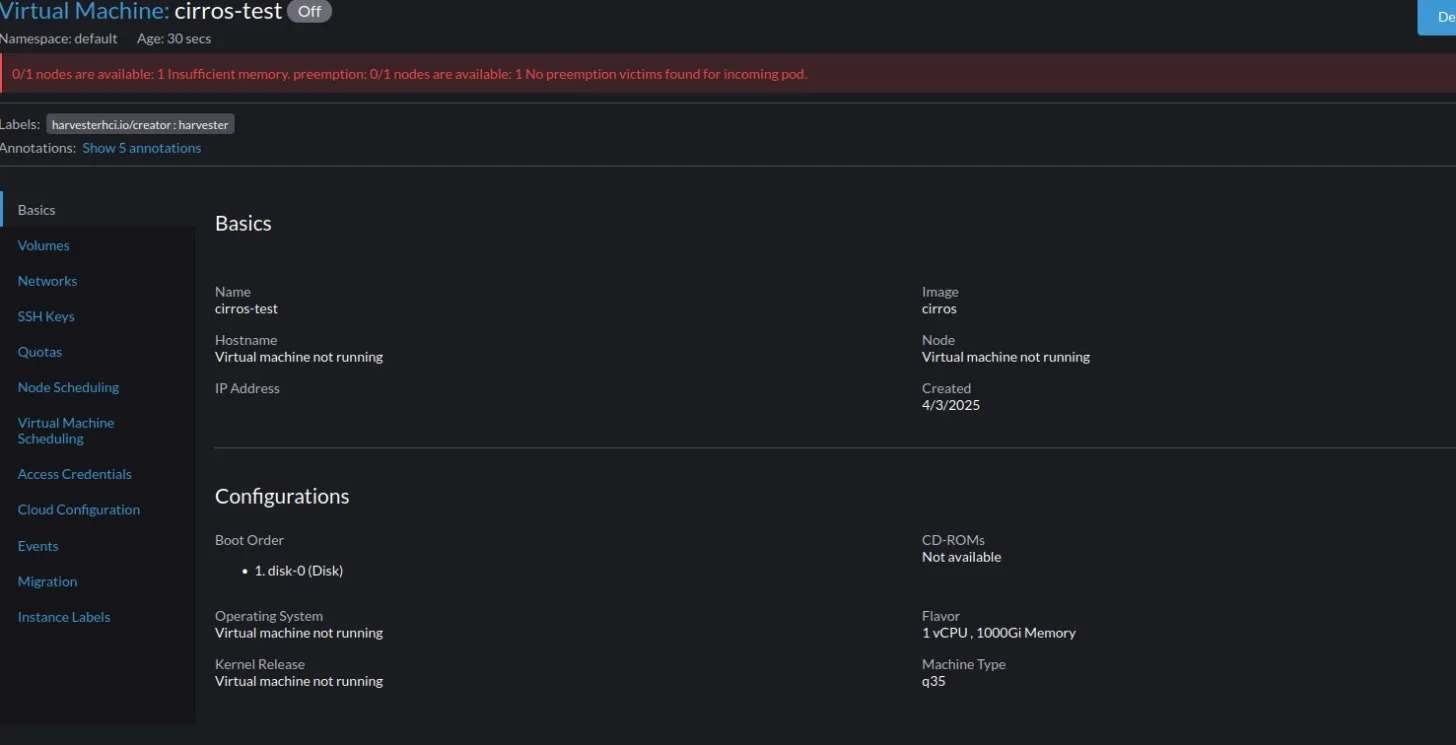
I look into another HCI solution: Suse Harvester. It’s actually a very good software, the UI is great and the install is easy. But if you want any kind of authorization and control over who can see what projects, you have to deploy rancher, which can then “consume” the harvester api and work with it. While excellent, I don’t really feel like having to set up rancher either on another server, or in a virtual machine.
In addition to that, I could not figure out how networking works, and how to set up a bridged network. I did deploy a virtual machine, although at first I accidentally gave it 1000 Gi of ram and it would not run because my machine does not have 1000 Gi of ram.
Also, I did find something funny though:

But at this point, I was done, and I began looking into something else, Incus.
Incus:
- Can be installed on top of another distro
- Has networking I understand, “simply” bridging
- Has authorization and authentication by restricting TLS certs to a project
- Not the complex SSO I want, but I need something working
Incus also has some nice features, like it can access a repository of LXC images (similar to Dockerhub), which is cool for testing out many different Linux distros.
Anyway, I did actually attempt to deploy it using Debian backports.
root@b718c16e3b2d:/etc/apt/sources.list.d# apt install incus
Reading package lists... Done
Building dependency tree... Done
Reading state information... Done
Some packages could not be installed. This may mean that you have
requested an impossible situation or if you are using the unstable
distribution that some required packages have not yet been created
or been moved out of Incoming.
The following information may help to resolve the situation:

The following packages have unmet dependencies:
 incus : Depends: qemu-system-x86 (>= 1:8.0) but 1:7.2+dfsg-7+deb12u12 is to be installed
E: Unable to correct problems, you have held broken packages.
Disappointing.
Instead, I followed the instructions on the github… mostly.
/etc/apt/sources.list.d/zabbly-incus-lts-6.0.sources
Enabled: yes
Types: deb
URIs: https://pkgs.zabbly.com/incus/lts-6.0
Suites: bookworm
Components: main
Architectures: amd64
Signed-By: /etc/apt/keyrings/zabbly.asc
This is a container, I will test a virtual machine install later on.
Installing Debian
https://wiki.debian.org/UEFI#Force_grub-efi_installation_to_the_removable_media_path — gotta do this in the installer
Networking
Switch from ifupdown/iproute2 to NetworkManager
/etc/network/interfaces
# This file describes the network interfaces available on your system
# and how to activate them. For more information, see interfaces(5).

source /etc/network/interfaces.d/*

# The loopback network interface
auto lo
iface lo inet loopback

# The primary network interface
#allow-hotplug enp0s25
#iface enp0s25 inet dhcp
Comment out network interfaces.
/etc/NetworkManager/NetworkManager.conf
[main]
plugins=ifupdown,keyfile

[ifupdown]
managed=true
And changed “managed” to true instead of false.
Once I do this, I use cockpit to convert the main network interface into a bridge that also a ethernet interface.
So I got incus working. In a new/incognito tab, you can go to /ui/login, and follow the instructions to set up the UI.
I attempt to set up an Alpine instance, with the network attatched directly to my ethernet/bridge combo. Yeah, that was a bad idea, as it took my network offline.
Instead, I decided to create a veth, and then attatch that to my bridge (openstack style… ugh. I can’t believe I’m doing this again).
nmcli con add type veth ifname veth1 con-name veth1 veth.peer eth1
And then add the veth1 as a port to the eth0 bridge.
And then after that:
incus network create public0 bridge.external_interfaces=eth1 ipv4.address=none ipv4.dhcp=false ipv6.address=none ipv6.dhcp=false
This essentially creates a public network with no dns and dhcp. Instead, vitual machines will get their required address via dhcp — and they do!
But I realize something: I have two ethernet ports available to me, but I am only using one of them. I should use either a bond or a team to combine them into one, and then convert that merged interface into a bridge that also acts as an ethernet port.
Based on this comparison chart, it looks like Teaming is better.
root@thoth:~# speedtest
Retrieving speedtest.net configuration...
Testing from California Research and Education Network (130.166.90.206)...
Retrieving speedtest.net server list...
Selecting best server based on ping...
Hosted by Melbicom (Los Angeles, CA) [32.80 km]: 2.94 ms
Testing download speed................................................................................
Download: 93.59 Mbit/s
Testing upload speed......................................................................................................
Upload: 86.25 Mbit/s
It looks like my upload and download is capped at 100 Mbit/s. Let’s see if we can double that.
Okay, but it looks like teaming has been deprecated — but in Red Hat, or in general? My Debian system still seems to be able to set up teaming.
Okay, but now that I know I want bonding, which mode do I want? Some modes seem to require configuration on the switch, which rules them out, but I want best performance from the modes I can use.
Testing time!
I did two kinds of tests: one with speedtest, and another with speedtest & speedtest & speedtest, to see if more in parallel would have different results.
Better than would it would be alone, but it still seems bad.
| Bond Method Used | Single Speedtest (Mbit/s) | Triple Speedtest Down | Triple Speedtest Up |
|---|---|---|---|
| No Bond | 93.59 down, 86.25 up | 30.12, 29.33, 23.13 | 41.62 Mbit/32.98, 52.79 |
| balance-alb | 93.60 down, 91.53 up | ||
| balance-rr | 99.95 down, 161.43 up | 58.96, 59.08, 61.67 | 59.84, 57.80, 59.80 |
| balance-tlb | 93.60 down, 87.51 up | ||
| 802.3ad / LACP | 93 down, 90 up | 32, 32, 28 | 31, 27, 29 |
| balance-xor | 35, 37, 17 | 38, 35, 46 |
Okay, that’s enough enough speedtest tests, I should probably switch to iperf3 to test parallel connections properly.
iperf3 -c ping.online.net -p 5203
Iperf testing:
| Bond Method Used | Single Stream (mbit/s) | Multi stream (mbit/s total) |
|---|---|---|
| No bond | 77 (average), 94 (top) | |
| 802.3ad / LAP | 94 , 77 | 80, 70 (no improvement…) |
| Round Robin | 120 | 167, 143 |
| balance-alb | 75 | 75 |
I notice that the first packet seems to have a lot less information, and then it’s the stuff after that that usually hits near 100 mbit/s in speed.
(I also ran a quick check with iperf to make sure that both interfaces actually worked, which they did, they both worked and got 70 mbit/s of bandwidth.).
Round robin works by just rotating which interface gets the next packet. According to the internet, it can result in packets arriving out of order, which can lead to slower speeds than a single nic in some cases. I can’t find any posts on this that are newer than 3 years old, so I don’t know if it applies, but I wanted to avoid round robin for that reason.
People say the best mode is LACP, but I don’t get any performance improvement — however, according to Red Hat’s documentation, this mode does seem to require some configuration on the side of the network switch. Perhaps without that configuration can still do a bond and combine two interfaces into one, but you don’t get any performance out of it?
But when I run iperf on each of the physical interfaces simeuataneously, perhaps there is some kind of cap? Maybe the “two” ethernet interfaces in the wall are actually only one? But then why does round robin have consistent, better performance, over the theoretical 100 mbit/s limit?
I think it is the former issue:
root@thoth:~# cat /proc/net/bonding/bond0
Ethernet Channel Bonding Driver: v6.1.0-32-amd64

Bonding Mode: IEEE 802.3ad Dynamic link aggregation
Transmit Hash Policy: layer2 (0)
MII Status: up
MII Polling Interval (ms): 100
Up Delay (ms): 0
Down Delay (ms): 0
Peer Notification Delay (ms): 0

802.3ad info
LACP active: on
LACP rate: slow
Min links: 0
Aggregator selection policy (ad_select): stable
System priority: 65535
System MAC address: 48:4d:7e:ec:54:2f
Active Aggregator Info:
        Aggregator ID: 1
        Number of ports: 1
        Actor Key: 7
        Partner Key: 1
        Partner Mac Address: 00:00:00:00:00:00

Slave Interface: enp0s25
MII Status: up
Speed: 100 Mbps
Permanent HW addr: 48:4d:7e:ec:54:2f
Slave queue ID: 0
Aggregator ID: 1

Slave Interface: enp9s0
MII Status: up
Permanent HW addr: 48:4d:7e:ec:54:31
Aggregator ID: 2
Much of the information has been ommitted for brevity, but it seems that if your switch doesn’t support/isn’t configured, then the “Aggregator ID” will be different when it’s supposed to be the same, meaning only one ethernet interface is actually getting used.
Instead of LACP, I set up loadbalancer-alb and use ifstat to moniter network traffic:
 enp9s0             enp0s25             incusbr0             bond0
 KB/s in  KB/s out   KB/s in  KB/s out   KB/s in  KB/s out   KB/s in  KB/s out
    1.17     13.88      1.91      0.12      0.00      0.00      3.09     14.01
    0.88     34.00      2.31      0.12      0.00      0.00      3.19     34.12
    0.87     13.68      1.30      0.12      0.00      0.00      2.17     13.80
    1.27     28.83      3.04      0.12      0.00      0.00      4.31     28.95
    1.02     75.72      8.41      0.70      0.00      0.00      9.43     76.42
    1.06   1645.20     36.86      1.95      0.00      0.00     37.91   1647.15
   10.93  11556.15    461.64   2343.31      0.00      0.00    472.64  13900.86
  662.03  12008.30      0.75  12008.21      0.00      0.00    662.78  24016.50
  378.35  12006.45    224.79  12010.69      0.00      0.00    603.08  24017.15
    1.47  11989.03    621.00  12012.35      0.00      0.00    622.53  24005.57
    1.21  12008.51    617.68  12010.60      0.00      0.00    618.82  24020.51
    0.90  12024.64    614.12  12012.30      0.00      0.00    615.02  24029.94
    1.14  11998.92    545.02  11707.88      0.00      0.00    546.16  23708.20
    0.72  12005.98    438.31   5809.23      0.00      0.00    439.04  17822.20
    1.17  12006.77    491.46   8342.55      0.00      0.00    492.70  20340.93
    1.11   5736.56    445.10  11851.00      0.00      0.00    446.14  17587.56
    2.98     32.26    115.14   4567.08      0.00      0.00    118.12   4599.34
Nice! When running two iperf tests at once, to two different servers, both are used at once, and I get double the network traffic! Both iperf tests report 80 mbit/s.
Then, I convert this bond to a bridge using cockpit. And the process of attempting to do so, the machine goes offline. It’s possible that you cannot convert a bond to the special bridge that also acts as a normal ethernet at the same time, or maybe you cannot use a bond as a bridge at all.
No, it does work. It’s just that the address was reasigned via dhcp, but I wasn’t sshing into the right port (I use port 22022 rather than the default 22).
And then: nmcli con add type veth ifname veth1 con-name veth1 veth.peer eth1
And then disable both from cockpit, but add veth1 as a port to the main bridge.
Then, eth1 can be used as a bridge for incus.
incus network create public0 bridge.external_interfaces=eth1 ipv4.address=none ipv4.dhcp=false ipv6.address=none ipv6.dhcp=false
And then it works.
It’s brought up to me by a friend, that there is a possibility that the limitation of speeds is not on my side, either the NIC or the cable, but instead on CSUN’s side, a 100 mbit/s limitation per mac address.
I test this by running three speedtests simultaneously, two on the side of CSUN’s internet, and one within a virtual machine that has it’s own Mac address. But the test only gets 200 mbit/s total from every device.
However, there is a real possibility I am using the wrong cables, and it’s the cables that are limiting. I will test
Incus Configuration
Firstly, I don’t want the “default” profile. It forces the incusbr0 network on virtual machines, whereas I want users to be able to select an for which network they want — either a public network or an internal network.
A big thing I want is for the layer8 project to have it’s own seperate set of networks and firewall rules, but still be able to have access to the public0 network I have created, so people can create public virtual machines.
From incus project edit layer8:
config:
  features.images: "false"
  features.networks: "false"
  features.networks.zones: "true"
  features.profiles: "true"
  features.storage.buckets: "true"
  features.storage.volumes: "false"
  restricted: "true"
  restricted.networks.access: public0, internal0
description: ""
name: layer8
used_by:
- /1.0/profiles/default?project=layer8
There is no network named internal0 — instead I add one in after I create the project. With this, they would be limited to a single internal network, and public network.
Bugs
I have found two, but haven’t really bothered replicating them to report them properly.
- ISO’s uploaded via the webui seem to always be put into the dfeault project instead of whatever project I want them to be in .
Only oidc.claim as email works (nickname or preferred_username or username) do not work for cli authentication to incus. Although they do work for webui auth.- Fixed. Either a newer update, or the decision to set up OIDC and Openfga from the get go have fixed this for me.
Kubernetes (Again)
Next up is the rest of the services I want to host. I still want to do a Kubernetes cluster, with everything GitOps though, but having Incus opens up another oppurtunity: I could do a multi node Kubernetes cluster, in virtual machines, instead of a single node.
I know I still want SSO, and I actually want SSO for Incus as well. After watching looking at openfga, it doesn’t seem to be nightmarishly hard. I think I will do a one node kubernetes cluster, again with openebs, reusing that same flux config. But this time, the deployment will be done in a virtual machine, where I can snapshot the entire virtual machine, feed it the gpu, or the extra hard drive I have. ’
Nah. I think I’m just gonna deploy bare metal.
Disable RKE2 ingress-nginx:
/etc/rancher/rke2/config.yaml
disable:
  # Yeah so apparently this was kind of important.
  # - rke2-coredns
  - rke2-ingress-nginx
And then enable servicelb, to allow for the ingress service to actually serve on a port on the host:
systemctl edit rke2-server.service
### Editing /etc/systemd/system/rke2-server.service.d/override.conf
### Anything between here and the comment below will become the new contents of the file

[Service]
ExecStart=
ExecStart=/usr/local/bin/rke2 server --enable-servicelb
Fix NetworkManager: https://docs.rke2.io/known_issues#networkmanager
And then RKE2 is set up.
Flux:
flux bootstrap git --url ssh://moonpie@moonpiedumpl.ing:22022/home/moonpie/flux-config --branch=main --private-key-file=/home/moonpie/.ssh/moonstack --verbose

cat age.agekey | kubectl create secret generic sops-age --namespace flux-system --from-file=age.agekey=/dev/stdin
But none of this works, because for whatever reason, the remote git repo on my server does not have any commits, even after I push the git repo.
git push origin origin/main
Can I change this to be the default? But my stuff deploys at least. Authentik is up again.
Coder
coder is an open source platform for remote desktop environments. The thing they seem to be most excited about is the VScode based environemnts, but I care the most about the terminal access, and the webvnc based environments.
Also, looking at their helm chart values, and their OIDC documentation it seems that environment variables are used to configure many aspects of coder.
So, I need to set up secrets again.
sops --encrypt --encrypted-regex '^(values.yaml)$' codersecrets.yaml
To get secret content after it is applied, for testing:
kubectl get secret secret -n namespace -o jsonpath="{.data.values\.yaml}" | base64 -d
One hiccup: I fear taht I may need to set a list of valid email domains that it accepts as OIDC users, documented here.
But looking through the code, it looks like I can leave that config empty.
So here are my two secrets, that I am encrypting (without the sensitive data, of course):
apiVersion: v1
kind: Secret
metadata:
  name: coder-pg-secrets
type: Opaque
stringData:
  values.yaml: |
    auth:
      username: coder
      password: "secretpassword"
database: coderapiVersion: v1
kind: Secret
metadata:
name: coder-secrets
type: Opaque
stringData:
values.yaml: |
coder:
env:
- name: CODER_PG_CONNECTION_URL
value: "postgres://coder:secretpassword@coder-db-postgresql.coder.svc.cluster.local:5432/coder?sslmode=disable"
- name: CODER_OIDC_CLIENT_SECRET
value: "OIDC Secret value here"sops --encrypt --encrypted-regex '^(values.yaml)$' --in-place filename.yaml
Whoops, this doesn’t deploy.
kubectl create namespace coder
It mostly worked, but I encountered an error:
Encountered an error running "coder server", see "coder server --help" for more information
error: access-url must include a scheme (e.g. 'http://' or 'https://)
So I had to change that variable.
One thing I decided to do is store the terraform configuration files in my git repo. They won’t be applied automatically,
But eventually, I got it deployed. I even set up a workspace, using the starter “kubernetes” template.
It doesn’t come with noVNC, which I really want. I’m looking at adapting the code from the desktop container in combination with the Kali Linux webtop image to get a web based Kali Linux environmet for CTF’s, workshops, and similar events.
Okay, this is actually kinda difficult.
s6-overlay-suexec: fatal: can only run as pid 1
So the webtop docker containers work by launching a complex set of init scripts using s6, and if I try to start s6 via the /init script in a shell, then it complains about not being pid one. I might have to create a custom container to get around this, but I don’t want to do that.
Another thing I can try is creating a “docker mod”, an extension to Linuxserver’s docker containers that can be called via an environment variable. Usage example here
I could also try the enterprise-desktop image by Coder themselves, but I really do want that kasmvnc and kali image.
Although, it looks like I don’t have time, since I need an emphermal desktop UI up now, for the lab. The coder templates repo has a “better vnc” image, which is a kasmvnc based image. But, there is no prebuild docker image for me to work with. I tried to replace the Dockerfile image with kasmweb’s docker image: docker.io/kasmweb/kali-rolling-desktop:1.17.0. But it didn’t work.
Instead, I built that image, and pushed it to docker hub.
I play around with the image, and the terraform code, but when I try to deploy it, I get an error. It’s unclear, but I think the problem is that the kasmweb images I used, is designed for docker, so when I try to deploy it on kubernetes, things break.
What about something else: With the Linuxserver images, what if I run a second command in the container. It looks like kubernetes can do this via container lifecycle hooks. I can also reuse these in the terraform.
This seemed interesting, and after some tinkering with security contexts (I think s6 init wants to start as root), I almost have it working but code-server has an error:
/tmp/code-server/bin/code-server: exec: line 28: /tmp/code-server/lib/code-server-4.8.3/lib/node: not found
Sometimes the persistent volume claim that Coder would createw ould fail to delete, becuse the container wasn’t getting deleted. To fix, I had to shell into the container, and then pkill coder, to destroy the zombie process.
But, after using the normal code-server install script, which installs a debian package into the system it works. But, after much tinkering, I’ve found that I don’t actually need code-server right now, so I got rid of it.
The important thing is the coder agent. This agent seems to not properly die, which somewhat makes sense, because I start it via a container lifecycle poststart hook having it be an actual command.
The problem is that even though the container dies properly if I exec in and kill the coder process (or PID 1), it doesn’t work if I have these commands as a lifecycle hook.
I also discovered that “coder.agent.main.startup_script” and “coder.agent.main.init_script” are different. Init script is what downloads and starts the actual coder agent, whereas the startup script is just auxilliary stuff you want to run, like downloading and starting code-server.
So I need a way to start the init script, such that it detatches and disowns itself and then the kubernetes contanier considers itself as running. After some tinkering, I got this:
command = ["screen", "-dmS", "coder_screen", "sh", "-c", coder_agent.main.init_script]
Because the container comes with screen already, I can do this, and reuse an existing container for coder with minimal modifications or changes to the terraform overall (other options I were looking into were things like using a volume mount to add more s6 services, but it is difficult because the init_script is autogenerated, so I don’t actaully know what it is, and I also still do not know if it is a shell script or just a sequence of commands set up by EOF).
Later on, however, I found a superior method. I could use a configmap, with files that created a new s6 service, and then mount that into the container. This is the configmap. It is then mounted into the container via terraform, and this is the config for that.
This has been much cleaner, and much more reliable to set up. Unlike the previous setup, which would randomly fail occasionally, forcing users to destroy and recreate the container, this works completely at all times.
Another thing I had to do, was to apply a networkpolicy that prevented any pod but the coder deployment from accessing the coder workspaces. They run an http server with the web interface, and it’s not authenticated, meaning without this, users can just find and connect to another users coder instances. I also considered trying to make the service only run on localhost, but I could not trivially figure out how to modify the services.
In the future, when I have more users, another thing I am considering NetworkPolicies depending on the groups a user is, to control which networks that the workspace has access to.
Next up is to inject the environment variables via secrets.
It took some tinkering but I got it working in the repo. Apparently, the postgres process doesn’t actually need the secret url I gave it, so I got rid of it.
I have now migrated to cloudnativepg.
But after this, I want to migrate away from my little injection hack to something more stable. I should be able to create a configmap, and then mount that into the container. I started working on this, and it looks like the command is not truly templated, but instead that many of the things like the api key are generated from environment variables.
Okay, the next thing I want to do for coder is to use a CUDA image for Leela chess 0, so I and my friends can take advantage of the power analysis capabilities of nibbler on the go. There are a few ways I can do this.
I think the easiest way to do this is to use a webtop podman image on the host, and then install all of the relevant gpu drivers and cudnnn lc0 from the aur. Then, I can commit the image and push it.
abc@43d4afccc294:/var/cache$ history
    1  sudo chown abc:abc config/
    2  ls
    3  cd config/
    4  ls
    5  sudo pacman -Sy git
    6  git clone https://aur.archlinux.org/packages/lc0-cudnn-git.git
    7  git clone https://aur.archlinux.org/packages/lc0-cudnn-git
    8  git clone https://aur.archlinux.org/lc0-cudnn-git.git
    9  cd lc0-cudnn-git/
   10  ls
   11  makepkg -si
   12  lc0
   13  cd ..
   14  ls
   15  git clone https://aur.archlinux.org/packages/nibbler-git
   16  git clone https://aur.archlinux.org/packages/nibbler-gi.git
   17  git clone https://aur.archlinux.org/nibbler-git.git
   18  cd nibbler-git/
   19  ls
   20  makepkg -si
   21  lco --help
   22  sudo pacman -Scc
This mostly works, except the lc0 backend wants a network file. I can probably put in a volume, where it has the
My concern, however, is image and model size. The image is currently very large, and I fear that loading cuda into ram for more than one container, may not duplicate the memory the way non gpu operations do.
Same goes for lc0’s model file.
I load it up in a podman container to test:
Latest version of CUDA supported by the driver: 12.4.0
WARNING: code was compiled with unsupported CUDA version.
CUDA error: CUDA driver version is insufficient for CUDA runtime version (../../src/neural/backends/cuda/network_cuda.cc:233)
error CUDA error: CUDA driver version is insufficient for CUDA runtime version (../../src/neural/backends/cuda/network_cuda.cc:233)
I was using an archlinux container, and a debian host.
I updated the nvidia driver (and cuda) on the host. Also, apparently the cuda libraries are mounted into the container, I don’t think I need cuda, although I do probably need cudnn.
podman run -it --rm -v ".:/config/lc0" --gpus all --entrypoint bash --user abc docker.io/linuxserver/webtop:arch-kde
makepkg -s
pacman -S ./ --assume-installed cuda=13
Oauth2
Another thing is that Oauth2/OIDC was not working. It seems that my method of secrets did not work, so instead I have to do something else, “envfrom”.
https://artifacthub.io/packages/helm/coder-v2/coder
https://github.com/coder/coder/blob/main/helm/coder/values.yaml#L31
In addition to this, I also set CODER_PG_CONNECTION_URL. It seems that I wasn’t setting that, which caused me to lose all user data upon upgrades.
But after this, I attempted to get OIDC role sync working. But it doesn’t work, as it seems that it’s a premium feature. And in addition to that, I cannot control what permissions OIDC users have from the UI, so I have to authenticate as the admin user from the command line, and then I can use coder user edit-roles moonpiedumplings
Authentik
It’s deployed (see previous project), but I am going to record my steps here. Firstly, it looks like I should configure from the “Application” page, and use “Create with Provider” in order to create the whole set of necessary things.
There were some interesting hiccups though. The “Issuer url” for Coder should have a backslash, it seems to use strict string matching.
error: create oidc config: configure oidc provider: oidc: issuer did not match the issuer returned by provider, expected "https://sso.moonpiedumpl.ing/application/o/coder" got "https://sso.moonpiedumpl.ing/application/o/coder/"Also, for Incus, it looks like I need to enable device code, otherwise it won’t work.
I’m now stuck for Incus, because it seems that single sign on only works if the services are on the same domain/subdomain. Incus is on a different domain, so it fails. I need to proxy a service external to Kubernetes, to something inside Kubernetes.
This is actually more difficult than I thought it would be.
---
apiVersion: networking.k8s.io/v1
kind: Ingress
metadata:
  name: incus
  annotations:
    cert-manager.io/cluster-issuer: "letsencrypt-prod"
    acme.cert-manager.io/http01-edit-in-place: "true"
    nginx.ingress.kubernetes.io/backend-protocol: "HTTPS"
  namespace: openfga
spec:
  rules:
  - host: incus.moonpiedumpl.ing
    http:
      paths:
      - pathType: Prefix
        path: "/"
        backend:
          service:
            name: incus-external-svc
            port:
              number: 8443
  tls:
  - hosts:
    - "incus.moonpiedumpl.ing"
    secretName: incus-tls
---
apiVersion: v1
kind: Service
metadata:
  name: incus-external-svc
  namespace: openfga
spec:
  ports:
    - protocol: TCP
      port: 8443
      targetPort: 8443
---
apiVersion: v1
kind: Endpoints
metadata:
  name: incus-external-svc
  namespace: openfga
subsets:
  - addresses:
      - ip: 130.166.79.34
    ports:
      - port: 8443
So this works, but it doesn’t get an SSL certificate. It just uses the default kubernetes test certificate, rather than a real one. To fix this, you have to remove these two annotations:
acme.cert-manager.io/http01-edit-in-place: "true"
nginx.ingress.kubernetes.io/backend-protocol: "HTTPS"
Before readding them. But don’t letsencrypt only last 90 days? But this works, however.
Next thing is, I want to automatically create projects in Incus when users are invited, so people can have a private (publicly hosted) VPS for whatever they want.
Right now, the most reasonable way to do this is to do a “stage” with an “expression policy”, which can execute arbitrary python code, and then I can make a API call with the python request library (using my private admin certificate).
Here are the Incus API docs on how to add a project. Here are the docs on how to bind an expression policy to a stage.
Okay apparently requests needs to read a certificate file in order to do TLS auth, and I don’t have one. I can probably get around this by creating a tempfile or something of the sort.
I may also need to make a python request to openfga… hmmm. I think this might be too complex. Firstly, let’s figure out what actually needs to be done:
- User does invite
- Create incus project named after user (via api call, that passes uses a tls certificate to authenticate)
- Add user to created project in openfga. I think this is giving a user either the operator or user relation to a project.
According to one of the test suites, it looks like the “user” of a project can interact with instances, but not edit them, whereas an operator has control over project level resources (but maybe is restricted by project restrictions.)
import tempfile
import json

ca_cert = ""

# Compressed backups?

incusdata = {
    "config": {
        "features.networks": "false",
        "features.profiles": "true",
        "restricted": {
          "backups": "allow",
          "networks.access": "public0, incus0"
        }
    },
    "description": "Personal project for you",
    "name": request.user
}

# Write the certificate to a temporary file since this will be ran inside authentik
with tempfile.NamedTemporaryFile(mode='w', delete=False) as tmp:
    tmp.write(ca_cert)
    tmp.flush()
    response = requests.post('incus.moonpiedumpl.ing',json=data, verify=tmp.name)


openfga_api_key = ""

headers = {
    "Authorization": f"Bearer {openfga_api_key}",
    "content-type": "application/json"
}


openfgadata = {
  "authorization_model_id": "stuff",
  "tuple_key": {
        "user": f"user:{requests.user}",
        "relation": "member",
        "object": "layer8"
    }
}

openfgaresponse = requests.post('openfga.moonpiedumpl.ing/stores/$FGA_STORE_ID/check', json=openfgadata, headers=headers)

return true
I will have to collect some information, on the authorization model id, and the store id.
Okay, I won’t sweat a custom project yet. But I will automatically add invited users to the layer8 group.
Creating an invite was pretty painful. There appear to be steps required, but not documented on the invitation documentation page, where you also have to bind an “invitation” stage as the first stage in the actual invite flow. Otherwise things don’t work.
But after some tinkering, and giving up on an expression policy that affects both Incus and openfga, and focusing on openfga instead, I got something that works:
import json

openfga_api_key = "secretkey"

headers = {
    "Authorization": f"Bearer {openfga_api_key}",
    "content-type": "application/json"
}


data = {
    "writes": {
        "tuple_keys": [
            {
                "user": f"user:{request.user.username}",
                "relation": "member",
                "object": "group:layer8"
            }
        ]
    },
    "authorization_model_id": "01JWHN0RS0QTJ4JJPJ659XCSPG"
}

openfgaresponse = requests.post('https://openfga.moonpiedumpl.ing/stores/01JWHMZPF85VE8DWYHKV90QTCT/write', data=json.dumps(data), headers=headers)

print(openfgaresponse)

return True
With this, users can sign up, and then they automatically get added as a “member” to the openfga object. Then they can log in via SSO to incus, and they have access to the layer8 project.
People have complimented me, saying that this setup is much, much easier to use than the previous setup, in which people had to import certificates.
But now it is time to update it. I think I will change it so that it happens not just on invites, but on logins, and it automatically adds and removes users.
So something like this:
import json
from authentik.core.models import Group

system_groups = ["authentik Read-only", "authentik Admins"]

all_groups = [group.name for group in Group.objects.all()]

all_groups = list(set(all_groups) - set(system_groups))

user_groups = [group.name for group in request.user.all_groups()]

openfga_api_key = "secretkey"

writes = {
    "writes": {
        "tuple_keys": [
            {
                "user": f"user:{request.user.username}",
                "relation": "member",
                "object": "group"
            }
        ]
    },
    "authorization_model_id": "01K70P5HAQ8K2J3AN978F7Y1EC"
}

deletes = {
    "deletes": {
        "tuple_keys": [
            {
                "user": f"user:{request.user.username}",
                "relation": "member",
                "object": "group"
            }
        ]
    },
    "authorization_model_id": "01K70P5HAQ8K2J3AN978F7Y1EC"
}


headers = {
    "Authorization": f"Bearer {openfga_api_key}",
    "content-type": "application/json"
}


for group in list(set(all_groups) - set(user_groups)):
  deletes["deletes"]["tuple_keys"][0]["object"] = f"group:{group}"
  requests.post('https://openfga.moonpiedumpl.ing/stores/01K70P3ZX9DJEHF85XDJS4PXN2/write', data=json.dumps(deletes), headers=headers)


for group in user_groups:
    writes["writes"]["tuple_keys"][0]["object"] = f"group:{group}"
    requests.post('https://openfga.moonpiedumpl.ing/stores/01K70P3ZX9DJEHF85XDJS4PXN2/write', data=json.dumps(writes), headers=headers)

return True
And this works beatifully. I assign this expression policy to the Incus application, and now groups of a user are automatically synchronized when they login. And then I do:
fga tuple write --store-id $FGA_STORE_ID group:admins#member admin server:incus — this gives the admins authentik group admin access to the server.
And then
fga tuple write --store-id $FGA_STORE_ID group:layer8#member operator project:layer8
And so on for each project I want a group to have access to.
In the future, I am thinking I could use this for CTF’s and the like, where I have a group with read only access to an Incus project and then I have multiple projects for a PvP ctf.
I also created a custom policy to enforce ascii usernames:
if not request.context.get("prompt_data").get("username").isalnum():
    ak_message("Only numbers and letters in usernames allowed")
    return False
elif (len(request.context.get("prompt_data").get("username")) > 16):
    ak_message("Username too long, 16 character max")
    return False
else:
    return True
Postgres update
So my authentik goes down, because I need to manually backup and restore the postgres database in order for an update to happen.
https://version-2023-10.goauthentik.io/docs/troubleshooting/postgres/upgrade_kubernetes
Except, since postgres updated automatically, it was crashing because it couldn’t launch with oldder database files. Firstly, I edited the pod and downgraded postgres.
But I got an ImagePullBackOff error, so I firstly listed all images running in the cluster, before seleccting the postgres image that was already there.
I have to get the secret myself:
cat /opt/bitnami/postgresql/secrets/postgres-password
It still says password authentication failed, but it does dump the file out.
I end with mv data data-15.
[moonpie@osiris ~]$ flux resume source git flux-system
[moonpie@osiris ~]$ flux reconcile helmrelease -n authentik authentik
But then I still can’t do things because I’m not root.
 resources: {}
    securityContext:
      allowPrivilegeEscalation: true
      capabilities:
        drop:
        - ALL
      privileged: false
      readOnlyRootFilesystem: true
      # runAsGroup: 1001
      runAsNonRoot: false
      # runAsUser: 1001
So I edit the pod with that. Doesn’t work, apparently only a few things can be changed.
I follow this stackoverflow answer, and come up with this:
root@thoth:/var/lib/rancher/rke2/bin# ./runc --root /run/containerd/runc/k8s.io/ exec -t -u 0 f2aedf564b6f43fc895fc84aeba2e7e7a02b4f59ea835de13b76bcade462adca bash
I’m root indeed, but I still am struggling to connect to the postgres server, and it is asking for a password. Actually, I can give it one — but my password contains special characters, making it difficult to enter manually. I can change the password, and then.
I encode special characters in the url, but it doesn’t work:
I have no name!@authentik-postgresql-0:/bitnami/postgresql$ psql 'postgresql://postgres:secretpassword/@localhost/' psql: error: local user with ID 1001 does not exist
I could nuke authentik and reset it, but instaed, I think I am going to change the secret authentik uses for the password, while downgrading postgres at the same time.
So firstly I need to edit the sops file:
export SOPS_AGE_KEY_FILE=~/vscode/flux-config/age.agekey
sops edit --ignore-mac secrets.yaml –ignore-mac is needed because sops thinks the file has been tampered with.
But even after editing the file, it still asks for a password, and it doesn’t work.
/opt
I have no name!@authentik-postgresql-0:/opt/bitnami/postgresql/conf$ cat pg_hba.conf
host     all             all             0.0.0.0/0               md5
host     all             all             ::/0                    md5
local    all             all                                     md5
host     all             all        127.0.0.1/32                 md5
host     all             all        ::1/128                      md5
The container doesn’t come with an editor. :/
Trying something else, there is a docker container, pgautoupgrade to automatically upgrade a database.
Firstly, I located the persistent volume in “/var/openebs” on the system. Then I ran the command:
root@thoth:/var/openebs/persistent/pvc-513c6021-afbb-410c-9c86-60fcf9d6089c# podman run -it -v "./data:/var/lib/postgresql/data" -e POSTGRES_PASSWORD=secretpassword -e PGAUTO_ONESHOT=yes docker.io/pgautoupgrade/pgautoupgrade:17-bookworm
The update works!
But authentik still fails to access postgres via the password. The logs for both simply say that password authentiation failed.
I also try some debug pods:
kubectl debug -n authentik authentik-server-5dcc9c45f5-thllc -it --image=busybox --target=server
kubectl debug -n authentik authentik-postgresql-0 -it --image=busybox --target=postgresql
Interesting and useful feature, but not helpful at the moment. :(
The Bitnami postgresql chart, used here, seems to have something to automatically update to the new passwords, but it requires the old passwords.
mv pg_hba.conf pg_hba.conf.bac
echo "local all all trust" > pga.conf (No text editor, and these config files don’t seem to be mounted.)
/opt/bitnami/postgresql/bin/pg_ctl reload
Then I can get in. Now I have to change the password manually.
psql -U postgres
And then:
postgres=# ALTER USER authentik WITH PASSWORD 'secretpassword';
ALTER ROLE
postgres=# ALTER USER postgres WITH PASSWORD 'secretpassword';
ALTER ROLE
postgres=#
Then I put the original pg_hba.conf back, and run pg_ctl reload.
And it works!
Flows and Stages
Just some nice to have things that don’t seem to be there by default:
InvitationsPasswords on the same sign in page- Recovery (password change flow)
I managed to get the latter pretty simply, by selecting a “password stage” in the options for the default-authentication-flow. After that, users no longer need to click twice, they can sign in from a single page.
Next up is password recovery. When I try to click on “Create recovery link” so I can create recovery links for users, I get an error “Recovery flow not applicable to user”.
Openfga
Okay, I deployed it using the helm chart. I’m lookiing through the Incus docs. So it looks like Incus does the intial setup.
Then, once I do that, I need to call the API to update relations.
Also, I need to add a nodeport service so that Incus can access the server. After scrolling through a very interesting security audit:
The likelihood is rated low as OpenFGA is designed to be run within an intranet environment and not exposed to public internet.
And this is somewhat difficult with my setup. I deployed it on Kubernetes, with no firewall, and now I want to expose the service — but only to localhost.
Actually that also doesn’t work. It looks like coder instances are placed on the same ip address as my host machine, meaning they would have access to all network stuff that localhost would.
No, looking further, it does look like openfga does use authentication, and the reason why an intranet is recommended is in case of ddos attacks.
Here is my secret:
apiVersion: v1
kind: Secret
metadata:
  name: mysecret
type: Opaque
stringData:
  values.yaml: |
    postgresql:
      auth:
        postgresPassword: secretpassword
    datastore:
      uri: "postgres://postgres:secretpassword@openfga-postgresql.default.svc.cluster.local:5432/postgres?sslmode=disable"
    authn:
      preshared:
        keys: ["secretkeyhere"]
Now that I’ve deployed it, I need to configure it.
Firstly, to get my preshared key:
kubectl get secrets -n openfga openfga-secrets -o jsonpath='{.data.values\.yaml}' | base64 -d
(I actually managed to remember this without looking at my notes. I don’t know if I should be proud or scared).
nix-shell -p openfga-cli, or other methods of installing the openfga cli.
export FGA_API_URL=https://openfga.moonpiedumpl.ing
export FGA_API_TOKEN=secretkeyhere
fga create store incus — only needs to be done once.
[nix-shell:~/vscode/moonpiedumplings.github.io]$ fga store list
{
  "continuation_token":"",
  "stores": [
    {
      "created_at":"2025-05-30T22:28:45.160445043Z",
      "id":"01JWHMZPF85VE8DWYHKV90QTCT",
      "name":"incus",
      "updated_at":"2025-05-30T22:28:45.160445043Z"
    }
  ]
}
export FGA_STORE_ID=01JWHMZPF85VE8DWYHKV90QTCT
export FGA_MODEL_ID=01JWHN0RS0QTJ4JJPJ659XCSPG
And then, I fill out the incus configuration values: openfga.api.token, openfga.api.url, and openfga.store.id with the appropriate values.
After this, running this command: fga model get --store-id=$FGA_STORE_ID outputs the incus openfga model.
[nix-shell:~/vscode/moonpiedumplings.github.io]$ fga tuple write --store-id=$FGA_STORE_ID group:layer8#member operator project:layer8
{
  "successful": [
    {
      "object":"project:layer8",
      "relation":"operator",
      "user":"group:layer8#member"
    }
  ]
}
[nix-shell:~/vscode/moonpiedumplings.github.io]$ fga query check --store-id=$FGA_STORE_ID --model-id=$FGA_MODEL_ID group:layer8#member operator project:layer8
{
  "allowed":true,
  "resolution":""
}
Neat!
But this doesn’t actually work. I attempt to sign on with single sign on, and it takes me back to the Incus logged out page, and the only information is a vague errorr: Uncaught (in promise) TypeError: NetworkError when attempting to fetch resource.
I get a little more information when I authenticate with the command line:
[nix-shell:~]$ incus remote add main https://incus.moonpiedumpl.ing --verbose --debug --auth-type=oidc
DEBUG  [2025-06-02T23:19:06-07:00] Connecting to a remote Incus over HTTPS       url="https://incus.moonpiedumpl.ing:8443"
DEBUG  [2025-06-02T23:19:06-07:00] Sending request to Incus                      etag= method=GET url="https://incus.moonpiedumpl.ing:8443/1.0"
Certificate fingerprint: b78c9aa9b22398a2255e93e4ba6a2e7f431c3f2e55503adb59a32e57f0471292
ok (y/n/[fingerprint])? y
DEBUG  [2025-06-02T23:19:07-07:00] Connecting to a remote Incus over HTTPS       url="https://incus.moonpiedumpl.ing:8443"
DEBUG  [2025-06-02T23:19:07-07:00] Sending request to Incus                      etag= method=GET url="https://incus.moonpiedumpl.ing:8443/1.0"
URL: https://sso.moonpiedumpl.ing/device?code=828932864
Code: 828932864

Error: not authorized
This is also vague, but something interesting shows up in the journald logs:
Jun 02 23:15:34 thoth incusd[1286]: time="2025-06-02T23:15:34-07:00" level=warning msg="Rejecting request from untrusted client" ip="130.166.192.112:12998"I found the error in the source code, but I don’t quite understand what’s going on.
After finding some discussion posts, I changed the oidc claim from preferred_username to email, and it works — kinda. It only works if I login and launch the web ui via the incus command line client (website still gets that error), and when I do so, I don’t have access to anything at all.
Also, incus seems to have an error in the logs, related to openfga:
Jun 09 17:33:15 thoth incusd[426476]: time="2025-06-09T17:33:15-07:00" level=error msg="Failed background OpenFGA resource sync" err="Failed to write tuple to OpenFGA store (user: \"server:incus\"; relation: \"server\"; object: \"certificate:025a3516ca2c622a93446548954e33d75eafa3e8173d0d6a435fc27d4072932e\"): Write validation error for POST Write with body {\"code\":\"validation_error\",\"message\":\"invalid TupleKey.Object: value does not match regex pattern \\\"^[^\\\\\\\\s]{2,256}$\\\"\"}\n with error code validation_error error message: invalid TupleKey.Object: value does not match regex pattern \"^[^\\\\s]{2,256}$\""fga tuple write --store-id=$FGA_STORE_ID group:layer8#member user server:incus
Still no dice. What about the admin role?
fga tuple write --store-id=$FGA_STORE_ID group:layer8#member admin server:incus
I also tried:
fga tuple write --store-id=$FGA_STORE_ID user:testuser admin server:incus, and variants including test@gmail.com (email address of my testuers).
Still doesn’t work, but I did learn something. It seems that openfga is not reading groups from ldap/oidc to figure out what groups users are in, but instead it has it’s own groups, that I have to add users to, as a relation.
Also, I switched the oidc claim back to preferred_username, instead of email, and it does show up as a different user:username in the openfga logs, instead of user:email.
Wait, that’s not true: If the user has server:admin permissions, then they can change server settings, even though they can’t see any instances or projects.
And if I give the user the operator relation to the layer8 project, then it can see only two of the 9 existing vitual machines :(
I have two theories:
This is something to do with accessing certain networks, specifically the
public0network I have, and thedefaultdisk pool. These aren’t considered under the “layer8” project, so they aren’t able to be accessed by the machine. It could also be the images, that are considered under project “default” and notThe Openfga relations are broken and need to be rebuilt.
Something else: Why am I trying to figure it out? It seems like sso users can access, view, create, and delete stuff, just not everything that is already there.
[nix-shell:~/vscode/moonpiedumplings.github.io]$ fga tuple write --store-id=$FGA_STORE_ID project:layer8 project profile:layer8/defaultThis enables my test user to see the layer8 default profile, but I really think this is the kind of relationship that should have been automatically added. And upon further searching, it seems that the two instances I care about, already are explicitly under the layer8 certificate.
~/vscode/moonpiedumplings.github.io> fga tuple write --store-id=01JWHMZPF85VE8DWYHKV90QTCT project:layer8 project instance:layer8/*

~/vscode/moonpiedumplings.github.io> fga tuple write --store-id=01JWHMZPF85VE8DWYHKV90QTCT project:layer8 project instance:layer8/Kal-Test
Sadly, the former doesn’t work, but the latter does. Also, it seems that when I move instances from one project to another, the openfga relations are created, allowing me to access stuff.
incus move --target-project default --project layer8 Kal-Test (the Instance must be stopped).
After creating a new storage pool, I see the relation that is missing:
      "key": {
        "object":"storage_pool:testpool",
        "relation":"server",
        "user":"server:incus"
      },
      "timestamp":"2025-06-16T23:29:34.933052608Z"
Adding this relation to the other storage pools, and then it works.
Next up is networks, which do not load.
I tried:
[nix-shell:~]$ fga tuple write --store-id=01K001MQRKQ1BH74FZP9H1V89X server:incus server project:layer8This doesn’t work, but is probably needed anyways so I am keeping it here.
[nix-shell:~]$ fga tuple write --store-id=01K001MQRKQ1BH74FZP9H1V89X project:layer8 project network:default/internal0Now it works, and people with access to the layer8 network can access this subnet. Although this kind of control seems to be redundant with the way that projects have a built in way to restrict what networks they use.
Finally, I also need to control storage pools.
 {
      "key": {
        "object":"storage_volume:layer8/layer8/virtual-machine/vmname",
        "relation":"project",
        "user":"project:layer8"
      },
      "timestamp":"2025-07-12T19:27:48.422892604Z"
    },
But this one was automatically added. Maybe Incus automatically syncs resources, and I don’t need to do it manually, I just need to wait?
Oh, and another issue I had is that after I rebooted my machine, all my openfga relations where lost. I forgot to deploy the openfga connected to the postgres, so no actual data was being stored persistently.
I also made the same mistake with coder earlier. In the future, I will delete my helmreleases and then redeploy them to ensure that the data is actually persistent.
I nuked the setup and attempted to reset it up again, but I ran into an issue. I tried some of the fixes in that thread, but they did not work (probably because ArgoCD is different from Flux).
What worked was a thread about flux, where essentially the problem is that flux waits for pods to be created before running post install jobs. But, sometimes pods can have a pod that doesn’t do anything but wait for the jobs to complete, so the waiting for the pods to be fully created must be disabled.
Drive
I am debating between Nextcloud, and other options.
Nextcloud:
- Popular
- But it’s in PHP, with an older architecture
- Extremely extendable, with many extensions/apps in their “store”
Opencloud
Forgejo
Firstly, here are relevant links:
https://artifacthub.io/packages/helm/forgejo-helm/forgejo
https://code.forgejo.org/forgejo-helm/forgejo-helm/src/branch/main/values.yaml — These are the actual values
https://forgejo.org/docs/latest/admin/config-cheat-sheet/ — and this is the forgeo cheat sheet, and all values in here can be set in the helm chart.
So what needs to be done is mainly the oauth/oidc login.
- Disable built in accounts (sign up, and log in)
- Oauth login
Another thing I want to do is deploy anubis to protect from scrapers. Due to the way that git forges seem to dynamically generate content, when scrapers attempt to scrape forges, there is a massive CPU load. A temporary workaround is I’m going to block viewing except for signed in users, but this will be a longer term solution.
To start, firstly it seemms like forgejo uses a syntax of existingsecret to be able to easily add secret data to the helm configuration.
Another thing I want to deploy is forgejo’s built in actions. However, according to the docs, it seems like actions are not ran in a virtual machine, like Github actions are. Instead they are ran in docker/podman/lxc containers, which is much, much weaker isolation from the host overall.
After some thought, I think the best way to do this is to not deploy a runner initially, but instead to deploy a virtual machine on Incus and connect it layer on. The most theoretically way to do this, I think, is to set up the docker-in-docker image to use the kata-containers runtime instead of normal docker, so the docker jobs are actually being ran in VM’s. I’m not really interested in a complex setup though, so I’ll just get it up first.
Right now I’ll just get forgejo up, but Incus provides Nixos images, and the forgejo runner has a nixos config.
Things were mostly going smoothly, until I was playing with oauth. I think that forgejo supports three different things that get conflated when I try to search for them:
- Acting as an Oauth2 client
- Logins via OpenID
- Acting as an Oauth2 provider
I am going through the forgejo docs right now (the website doesn’t support search so I cloneed the git repo), and it appears that being an Oauth2 client is not really documented. OpenID is barely documented beyond a brief mention, it’s only the Oauth2 provider that is extensively mentioned.
But I know that forgejo supports more Ouath configuration options beyond what the helm chart mentions like in this example
I suspect this is because setting up an Oauth2 provider via the UI is trivial and self explanatory. But I am not using the UI, so I found the relevant source code, and it explains the options.
The issue is the way I do secrets. I was copying the existingSecret syntax from the bitnami subcharts, but that does not work. Forgejo has two ways to do secrets. I dislike both of them, because I am trying to amke as much of my infra public as possible, except for the keys themselves. But with redis, I am forced to have the host option, which includes a password, be encyrpted in it’s entireity.
Well, I could use variables, but those also add complexity. After some pondering, I think the best way to do it is to just have commented out versions that do not include the sensitive data.
So I map out all the options, fix some minor issues, and I think the forgejo pod fials to deploy because I have “hostport” set, which doesn’t work if forgejo is doing a rootless deployment.
To fix:
security:
  containerSecurityContext:
    sysctls:
    - name: net.ipv4.ip_unprivileged_port_start
      value: "0"
This doesn’t work, because apparently it only affects the pod’s network namespace, and not the host.
Another way to do this is by using a nodeport or loadbalancer service, but the reason why I am not a fan of those is that due to klipper-lb, all connections to ssh that way would appear to have the ip address of my server machine, rather than the ip address of the user.
I guess the best way to do this is to expose extra ports using ingress-nginx, and then use ingress-nginx to expose a tcp service. One problem is that the method to expose tcp services is specific to ingress-nginx, and not general.
│ init-app-ini An app.ini file already exists. To prevent overwriting secret keys, these settings are dropped and remain unchanged:                                                        │
│ init-app-ini   - security.INTERNAL_TOKEN                                                                                                                                                 │
│ init-app-ini   - security.SECRET_KEY                                                                                                                                                     │
│ init-app-ini   - oauth2.JWT_SECRET                                                                                                                                                       │
│ init-app-ini   - server.LFS_JWT_SECRET
Are these settings important enough for me to set manually? According to the docs they are
Also, I think that the configuration settings are not changed to the default if you unset them in the helm settings, they stay what they are. So I must explicitly change them.
2025/07/25 06:52:18 ...c/net/http/server.go:2294:ServeHTTP() [I] PING DATABASE postgres
2025/07/25 06:52:18 ...eb/routing/logger.go:102:func1() [I] router: completed GET /api/healthz for 130.166.79.34:49228, 200 OK in 0.8ms @ healthcheck/check.go:67(healthcheck.Check)
2025/07/25 06:52:20 ...dules/auth/common.go:18:UnmarshalGroupTeamMapping() [E] Failed to unmarshal group team mapping: ReadMapCB: expect { or n, but found m, error found in #1 byte of ...|map[layer8:|..., bigger context ...|map[layer8:map[csun:[layer8]]]|...
2025/07/25 06:52:20 .../auth/linkaccount.go:294:LinkAccountPostRegister() [E] SyncGroupsToTeams: ReadMapCB: expect { or n, but found m, error found in #1 byte of ...|map[layer8:|..., bigger context ...|map[layer8:map[csun:[layer8]]]|...
This error happened becasue the oauth “group mappings” where wrong. I quote them and it works.
But the group mappings are not actually replied. When I configure authentik to restrict logins to anybody who has a groups claim in their scope, my test user cannot log in at all. Either Forgejo is not collecting the groups claim, or authentik is not giving it.
From the authentik logs:
{"auth_via": "session", "domain_url": "sso.moonpiedumpl.ing", "event": "Application requested scopes not configured, setting to overlap", "host": "sso.moonpiedumpl.ing", "level": "info", "logger": "authentik.providers.oauth2.views.authorize", "pid": 70086, "request_id": "aabf16600fcb46e587f201bdec77a769", "schema_name": "public", "scope_allowed": "{'email', 'profile', 'openid'}", "scope_given": "{'email', 'groups', 'openid'}", "timestamp": "2025-07-26T11:23:10.187861"}Also, attempting to ask for the preferred_username claim, it also fails. But the email claim works. So essentially, nothing from the profile scope works, even when I explicitly ask for it.
OPENID_CONNECT_SCOPES: "openid email groups"
I think this was the problem, it doesn’t have the profile scope. After removing this config, the group mapping works (but I must create the organization and group in advance).
cope": "email profile openid openid", "state": "825aa86d-46bf-4ce6-8565-3a92069a3780"}, "method": "GET", "path": "/application/o/authorize/", "request_id": "c59d08ff43a647da80c3037a453d9c4
a", "user_agent": "Mozilla/5.0 (X11; Linux x86_64; rv:141.0) Gecko/20100101 Firefox/141.0"}, "scopes": "email profile openid"}, "domain_url": "sso.moonpiedumpl.ing", "event": "Created Even
t", "host": "sso.moonpiedumpl.ing", "level": "info", "logger": "authentik.events.models", "pid": 91040, "request_id": "c59d08ff43a647da80c3037a453d9c4a", "schema_name": "public", "timestam
p": "2025-07-27T06:42:40.711920", "user": {"email": "test@gmail.com", "pk": 7, "username": "testuser"}}
It seems to try to get the openid scope twice though, so I removed it from the config again.
Okay, I tried to start forgejo today and I got an error about not being able to find the database. What happened, is that the Bitnami Helm Charts that deploy the databases, are no longer publicly available for use. Forgejo’s Helm Chart now recommends operators for databases.
So I am searching for some options for operators for postgres:
- CloudNativePG
- Most promising, also newest
- Semi-automatic major version upgrades are appealing to me: https://cloudnative-pg.io/documentation/1.26/postgres_upgrades/#offline-in-place-major-upgrades
- Crunchy Postgres Operator
- Zalando
For redis… I think I am going to switch to the internal cache implementation instead. Although this results in an error, and I have to put a puase on forgejo for now.
Netbird
I am planning to deploy netbird, an open source mesh VPN. It’s similar to tailscale. It is also very popular, UC Irvine’s cyber club is using it, and the cybersecurity competition we do mainly has migrated from globalprotect to netbird, now. I want a kubernetes deployment, because similar to the other services, I would like automatic upgrades.
I found a few existing helm charts:
- https://github.com/netbirdio/helms/tree/main/charts/netbird — Official one’s.
- https://github.com/KitStream/helms/tree/main/charts/netbird — Unofficial, but looks well maintained by a corporate entity
- https://github.com/jaconi-io/helm-charts — Commmunity made, but well made
There is also a project called app templates that is a general helm chart that can be used to deploy arbitary containerized apps. You can search through flux helmrelease’s on github, with a focus on the app template, via kubesearch.dev. I found one there.
Anyway, I want auto updates. The problem is that the helm charts above, don’t specify the image tag used. This means, that when the helm chart updates, the deployment would not actually be recreated, so the image wouldn’t change. The other helm charts I am using,
What would be cool, is to configure flux so that it uninstalls and reinstalls helm charts as part of the upgrade process, instead of running upgrade internally. And then if I set the ImagePullPolicy in the deployments (which can be configured through the helm charts), then the latest version of the images would be pulled among flux updates. This doesn’t look trivial to do, and in addition to that, this would only trigger if the helm charts update. If they don’t, then flux would never do anything to them.
Another solution is this or a similar solution.
Wait, upon further research, it looks like the official helm chart does specify the images, and it defaults to the appversion, which is part of the helm chart itself. Unfortunaltely, the appversion is outdated.
The helm chart that the official netbird charts is forked from is much more up to date, but still on 0.60.2 instead of the latest 0.66.
The kitstreams chart seems to be adding work to auto update, which is promising. Since that was merged, I think I will be selecting that helm chart.
It’s not perfect, though, one problem with it is the ingresses it creates rely on nginx specific annotations, although ingress-nginx is deprecated. Traefik, which I am using has a compatibility layer.
Cloud Native Postgres
https://artifacthub.io/packages/helm/cloudnative-pg/cloudnative-pg
I started out by just copying the repo and helm release templates that I have previously used. It works easily, without me passing in any values. It seems that postgres does not require any configuration.
Firstly, deployed a test database using an example from their quick start. However, I deployed only one instance, instead of 3, because I only have one physical server.
Although cool, that’s not enough. I also need to ensure it has the correct username/password, and that it restores the information that was previously in older postgres database that forgejo was using.
forgejo data-forgejo-postgresql-0 Bound pvc-9a77499a-71d8-4a7b-bda4-fd8d66c1c86c 10Gi RWO openebs-persistent-hostpath <unset> 25d
Thankfully, using openebs local paths, makes it easy to actually go in and fine the database files.
root@thoth:/var/openebs/persistent/pvc-9a77499a-71d8-4a7b-bda4-fd8d66c1c86c/data# ls
base    pg_commit_ts  pg_ident.conf  pg_multixact  pg_replslot  pg_snapshots  pg_stat_tmp  pg_tblspc    PG_VERSION  pg_xact               postmaster.opts
global  pg_dynshmem   pg_logical     pg_notify     pg_serial    pg_stat       pg_subtrans  pg_twophase  pg_wal      postgresql.auto.conf
Now, I need to figure out how to import from this. I think what I’m going to have to do, is run a postgres docker container, and then dump the database, so I can import into a new database.
Firstly, I will backup the files to ensure that anythign I do doesn’t nuke all my data.
root@thoth:/var/openebs/persistent/pvc-9a77499a-71d8-4a7b-bda4-fd8d66c1c86c# tar -czf data.tar.gz data/
I also ran a test to extract the archive, to make sure that worked. Now that I’ve done this.
In addition to that, I will need to create a cluster and a database to import the data into.
But when I attempt to start a database using the postgres docker container, it complains that certain config files (like postgres.conf, pg_hba.conf) are not found. Bitnami’s helm version of postgres seems to automatically create these files somewhere else than the data directory.
Although possible to create those, I think an easier way might be to deploy the older version of forgejo, and then export the data from there using the pgsql cli. It errored due to ownership at first, so I had to run chown.
root@thoth:/var/openebs/persistent/pvc-9a77499a-71d8-4a7b-bda4-fd8d66c1c86c# chown -R 1001:1001 data
And with this, forgejo (and the database I care about) is finally up. I can shell into it, and run pg_dump.
I have no name!@forgejo-postgresql-0:/bitnami/postgresql/backupdir$ pg_dump -U forgejo -f dump.sql
Password:
I have no name!@forgejo-postgresql-0:/bitnami/postgresql/backupdir$ ls
dump.sql
Next up is to deploy the new database. One of the interesting things about cloudnativepg is that it doesn’t just deploy a database, it deploys a cluster, and then deploys databases to that cluster. But, is it better to deploy one cluster with multiple databases, or multiple clusters?
Architecture of postgres cluster/database:
- https://cloudnative-pg.io/documentation/1.17/architecture/
- https://www.cncf.io/blog/2023/09/29/recommended-architectures-for-postgresql-in-kubernetes/
One thing I found via some preliminary research is that CloudNativePG’s backup solutions seem to be cluster based, rather than database based. They have some harsh words about database dumps, anyways:
This section covers physical backups in PostgreSQL. While PostgreSQL also supports logical backups using the pg_dump utility, these are not suitable for business continuity and are not managed by CloudNativePG. If you still wish to use pg_dump, refer to the Troubleshooting / Emergency backup section for guidance.
I think the best option is to have a cluster for each app. This way I could back up each app’s database/cluster, using CloudNativePG’s tools. This backup might not just be for recovery purposes, but also I might want an older version of the database at some point.
Another thing is that it seems that the Cluster resource can automatically initialize a database, using configuration found here. The way that secrets work is documented here.
Also, when cloudnativepg deploys a cluster, it automatically creates kubernetes services for the database.
NAME                  TYPE        CLUSTER-IP      EXTERNAL-IP   PORT(S)    AGE
anubis-forgejo        ClusterIP   10.43.225.133   <none>        80/TCP     42d
forgejo-postgres-r    ClusterIP   10.43.188.149   <none>        5432/TCP   5s
forgejo-postgres-ro   ClusterIP   10.43.26.224    <none>        5432/TCP   5s
forgejo-postgres-rw   ClusterIP   10.43.254.130   <none>        5432/TCP   4s
This is pretty neat, you can have readwrite and readonly versions of services. I think I will disable everything but the readwrite serivce, however.
Although cool, I found that even though cloudnativepg creates a persistentvolumeclaim, it deletes it when it is done. This is bad because it means that if I delete the postgres cluster I lose the data. It looks like what you are expected to do, is to backup the
Another thing to not about storage, is that postgre does not need journaling. I should probably create a custom PersistentVolumeClass that has writeback/journaling disabled for that folder only. But that seems to not be possible, so instead I will use openebs block volumes, which are designed for this use case.
Also, it turns out that the local.csi.openebs.io is the newer provisioner, and supports more features than the older openebs.io/local that I was using. It also looks like migration is not trivial, so I will probably only use the newer interface for just this.
It does look like I need to have an actual LVM partition/disk available on my host. In addition to that, I also think I may need to update openebs to get access to the newer openebs.io/local chart.
Okay, this really sucks, but Bitnami helm charts break tomorrow (today is 8/27/2025). I need something to keep these services up, and that means forgoing an OpenEBS update, and using a journaled filesystem for my databases. I do at least want backups, so I will investigate how to do those. When combined with simultaneously trying to figure out why my network is wonky, I just don’t have enough time. I suppose stuff like this is why real engineers work as teams.
The problem is backups. CNPG supports two methods, one of which is an object store, and another is via volume snapshots. I wanted to avoid setting up an external object store, especially from the paid platforms.
I wanted to use snapshots, but openebs hostpath does not support volume snapshots. And I don’t have enough time to build and test backups. I think I will use pg_dump, despite them “not being suitable for business continuity”.
It looks like there is no easy way to have the PVC’s not delete themselves either. It seems that what you are expected to do is really to bootstrap a new cluster from the backups, like documented here.
Okay, I think I could use openebs-rawfile for some of those features like snapshots.
03:21 < moonpie> okay I get a little bit more time to think
03:22 < moonpie> Like I am considering either zfs or lvm on my extra 4 tb hard drive and then using that for both incus storage and k8s volumes
03:22 < moonpie> (wait no I don't actually get time to think they want forgejo up)
05:27 < moonpie> dumbmf_: okay now it says I need to enable javascript...
05:51 < moonpie> okay
05:51 < moonpie> except for openebs rawfile, I cannot find any solution for block/no filesystem based csi's
05:51 < moonpie> it's kinda weird
05:52 < moonpie> because if you are hosting a dtabase on k8s, it makes sense to not uses a clustered filesystem, because db's do it better
05:52 < moonpie> and they also recommend no journaling/copy on write for performance, and again, because dbs do it better
05:52 < moonpie> but all of the raw block csi options I have found require lvm, zfs, or other partitions/disks to be provisioned
05:53 < moonpie> Like.. why can't I just have one disk and you create loopback devices?
05:53 < moonpie> that's what openebs rawfile does, but it's not cooked yet
05:53 < moonpie> I guess you could say it's a bit... raw
05:54 < moonpie> but the thing is
05:54 < moonpie> even if I forgo no-filesystem based setups
05:55 < moonpie> I still want a hostpath storage class that uses CSI's, so I can use the CSI snapshot/backup feature to handle databases
05:55 < moonpie> CloudnativePostgres attempts to delete the persistentvolume even if you have the policy set to retain — what they expect you do when you spin up a new cluster is just restore from backup, not reattatch an existing
                 volume
05:55 < moonpie> But I haven't been able to find a hostpath based CSI either
05:57 < moonpie> There is a reference implementation, but it says it's "not production ready"
05:57 < moonpie> https://github.com/kubernetes-csi/csi-driver-host-path
05:57 < moonpie> well, it actually does seem to be less usable, then say, alpha software
06:00 < moonpie> I didn't want to use either zfs or lvm
06:00 < moonpie> my main concern was configuration as code
06:00 < moonpie> I want as much as my config in the git repo as possible
06:01 < moonpie> creating a zfs/lvm pool is not that. I can do it ofc, but it's not really what I want
06:02 < moonpie> I was thinking, if I had to redo this setup in the future, I could use Nixos for declarative config of incus and then use https://nixos.wiki/wiki/Disko
06:03 < moonpie> Idk. I feel like there is something i am missing
06:04 < moonpie> like if you have one disk and you want to run a database on k8s, what are you dong?
06:04 < moonpie> Does everybody just use lvm or zfs on their root?
I think the correct choice here, is to deploy longhorn, with a single replica. And then use that for block storage. That’s also probably what people are doing in the real world. Such a setup reuses the clustered storage you are already using, but in a slighly different configuration that enables you do maximize the performance of your databases.
I also ran an intemediary check, to make sure that openebs hostpath does not support block volumes, and it does not. I attempt to create a longhorn block device for cloudnativepg, and that fails, because I guess it expects a filesystem.
This doesn’t really make sense to me. But I did get cloudnativepg deployed. I can even request a backup via a volumeshapshot:
kubectl cnpg backup -m volumeSnapshot -n forgejo forgejo-postgres
They don’t seem to have a command to restore from a backup though. It seems like you are expected to bootstrap a cluster from a backup instead.
To load the database, first I cp the dump in from my laptop:
[moonpie@cachyos-x8664 dormlab]$ kubectl cp dump.sql -n forgejo forgejo-postgres-1:/var/lib/postgresql/data/dump.sql
Defaulted container "postgres" out of: postgres, bootstrap-controller (init)
Then, inside the container I load the dump:
postgres@forgejo-postgres-1:~/data$ psql -U postgres -d forgejo -f dump.sqlAnd then I spin up forgejo again, pointing to the new database, and it’s finally up.
I have decided to forgo automatic backups, because there there is no easy way to have a retention policy with volumesnapshots.
Instead, I will just do occasional manual snapshots.
I have automated snapshots, but the retention policy is poor. I must prune the snapshots manually.
LLMs
I am currently looking into options. I want OIDC sign in, and RAG.
I see for frontend options:
- Openwebui
- Non open source license, but it’s only restricting the ability to rebrand the UI
- Helm chart provided
- Librechat
- https://github.com/Mintplex-Labs/anything-llm
- https://github.com/Cinnamon/kotaemon
- https://github.com/ItzCrazyKns/Perplexica
- Designed as mainly an alternative to perplexity than a full chatgippity alternative
- https://github.com/oobabooga/text-generation-webui
For backend options:
- Ollama
- https://github.com/Nexesenex/croco.cpp
- Fork of KoboldAI
- Llmariner
- Okay, this seems to require the Nvidia operator and an s3 compatible object store
- https://github.com/mudler/LocalAI
- This one is cool because it seems to let you select between multiple backends, like llama, exllama, and more
- It also explicitly supports cpu only, intel, amd, and vulkan. Although not relevant to my usecase, this is very interesting.
After some consideration, I decided to deploy Open Web UI. It appears to be the most comprehensive, and has an official helm chart.
Here are the helm chart values: https://github.com/open-webui/helm-charts/blob/main/charts/open-webui/values.yaml
It appears that a subchart of the ollama application is included in openwebui chart, as well. I deploy a fairly simple config, and then I get an error when attempting to use OIDC to sign in:
"You do not have permission to access this resource. Please contact your administrator for assistance."
This was fixed by ensuring that the users in groups I wanted to be able to connect were set in “allowedRoles”.
Another concern I have is that ollama does not have any form of authentication Although less of a concern in the real world, wehre the inside fo teh kubernetes cluster is considered trusted, in my lab, I give people access to the internal subnet. I could restrict traffic flows to this service via Network Policies, but I would rather add some form of authentication to the service. Here is an example using caddy.
I decided to use Caddy. I stopped using the ollama subchart, because I wanted to manually feed an ollama url to openwebui instead of letting openwebui guess.
[moonpie@cachyos-x8664 flux-config]$ nix-shell -p caddy genpass
[nix-shell:~/vscode/flux-config]$ genpass -dlu
generatedpassword
[nix-shell:~/vscode/flux-config]$ caddy hash-password
Enter password:
Confirm password:
$2a$14$LdqC7FEIx2w6arGCNw7Pi.qxe2kFSvBecz.IvtdcdLvJe4V.xeyhi
This gets me a password and a hash to use. I feed that to the config, and my default ollama url looks something like this: http://ollama:secretpassword@ollama.owui.svc.cluster.local:11434.
Another thing that annoyed me is changing the openwebui pipelines api key to something more secure by deafault. The necessary environment variable, PIPELINES_API_KEY does not seem to be documented, but I found it on a github issue.
Okay, after the rebuild where my hard drives died, I made some changes to authentik, where user accounts no longer have emails.
But many applications, like Openwebui, expect email. On the OpenWebui docs, they mention an environment variable, ENABLE_OAUTH_WITHOUT_EMAIL, that is necessary for OAUTH users without email to sign in.
It doesn’t work. The config option is not real. Despite being mentioned in a github issue, I could not find it in the source code.
While reading the source code of where it should be present, I notice something that looks relevant: ENABLE_OAUTH_EMAIL_FALLBACK.
This config option, when set to true, and OAUTH_SUB_CLAIM is set to preferred_username, makes everything work.
Models
I do need to select a small set of good models. I am designing for a multi user system, meaning if too many people have too different models, I will run out of ram.
One thing that is cool, is that I am not limited to using models from ollama’s repo, as ollama can download models from huggingface and OCI repos.
Although, one irritating I have noticed is that the model download doesn’t continue if I close the tab. I must leave the tab open for the model download to complete, despite the fact that the download is handled by ollama and doesn’t depend on anything from my browser session. Thankfully, it seems to save partial progress and does restore when I start it up.
I’m also interested in the new-ish embeddinggemma:300m model.
Ingress
Ingress-Nginx
Okay, I thought I was done configuring Ingress-Nginx, until I logged into my Authentik and saw that all the logins appeared to be coming from the IP address of my host machine rather than the actual client IP of people who are connecting.
Fiddling with it a little, I found an issue relevant to my setup: https://github.com/k3s-io/klipper-lb/issues/31
Another relevant discussion: https://github.com/k3s-io/k3s/discussions/2997#discussioncomment-1617536
It turns that out klipper, the k3s inbuilt load balancer, does not forward the real client ips to services.
So, the main way people get around this is externaltrafficpolicy, which probably works fine for my usecase, but the problem is tha in th real world, it risks imbalanced load balancing, which is why I’m trying to figure out how to get around it.
So I’m playing around with a few options:
- Externaltrafficpolicy
- Loadbalancer
- Klipper doesn’t wrk for reasons mentioned above
- Ingress-nginx docs confirm that MetalLB cannot reuse the host’s ip address or one’s assigned by dhcp.
- Nodeport
- It looks like nodeport still doesn’t preserve the original source ip address, unless you set externaltrafficpolicy to local
- hostport (ingress-nginx helm chart option where it exposes a port instead)
- Hostnetwork.
And now TLS doesn’t work, even if I switch back to load balancer.
First I’m trying hostport.
Deployment in version "v1" cannot be handled as a Deployment: json: cannot unmarshal string into Go struct field PodSpec.spec.template.spec.hostNetwork of type bool
Okay. I’ve tried hostport, nodeport, and externaltrafficpolicy. They all have this issue where I cannot actually access the proxied services on the subdomain, but instead it just takes me to my blg instance I hosted (that I never set up ssl for).
But, even after I switch back to the default setup, I am still encountering this issue.
[moonpie@osiris flux-config]$ kubectl get service -A
NAMESPACE       NAME                                    TYPE           CLUSTER-IP      EXTERNAL-IP        PORT(S)                      AGE
blog            blog-nginx                              LoadBalancer   10.43.227.101   130.166.79.34      80:31748/TCP,443:31264/TCP   65d
Much content ommited. But, it looks like my blog attempted to eat my main ingress ports. Okay, it looks like Bitnami’s nginx was creating a Loadbalancer service. I considered changing the ports it served on (there doesn’t appear to be a built in option to disable the service), but I wanted to learn how to patch helm charts so I did something else.
spec:
  chart:
    spec:
      chart: nginx
      reconcileStrategy: ChartVersion
      sourceRef:
        kind: HelmRepository
        name: nginx
      version: "18.3.1"
  postRenderers:
    - kustomize:
        patches:
          - target:
              kind: Service
              name: blog-nginx
            patch: |-
              $patch: delete
              apiversion: v1
              kind: Service
              metadata:
                name: not-used
And with this, there is no more loadbalancer service created.
Oh, and it turns out that coder also creates a loadbalancer service, but thankfully there is a build in option, to change it to ClusterIP, since the ingress coder creates still wants to look at the service.
And yeah. Now, wien I sign in to Authentik, the actual ip address of the users who log in shows up.
Next up is to enable port 22 for the deployment. In addition to this, I also had to change the deployment strategy, otherwise the pods would not recreate.
postRenderers:
    - kustomize:
        patches:
          - patch: |
              - op:  add
                path: /spec/template/spec/containers/0/ports/-
                value:
                  containerPort: 22
                  hostPort: 22
                  name: ssh
                  protocol: TCP
            target:
              kind: Deployment
              name: ingress-nginx-controller
  interval: 1m0s
  values:
    controller:
      updateStategy:
        type: rollingUpdate
        rollingUpdate:
          maxSurge: 100%
          maxUnavailable: 100%
The problem is that when I attempt to do a helm upgrade, one of the deployment pods will not be deleted. But, that pod binds ports. So because the pod is never deleted, the new pod can never be created (because I am on a single node).
The other bit I added was opening port 22 so I can use a tcpserver to expose the Forgejo SSH service.
Okay. I patch the deployment of ingress-nginx and I get this error:
Events:
  Type     Reason            Age                From               Message
  ----     ------            ----               ----               -------
  Warning  FailedScheduling  93s (x3 over 11m)  default-scheduler  0/1 nodes are available: 1 node(s) didn't have free ports for the requested pod ports. preemption: 0/1 nodes are available: 1 No preemption victims found for incoming pod.
I don’t think the ssh server is already in use, because I can run services using port 22. But Kubernetes refuses to schedule pods that use that port. It could be that it’s actually the other ports that are having issues:
 strategy:
  rollingUpdate:
    maxSurge: 100%
    maxUnavailable: 100%
  type: RollingUpdate
With this “strategy”, the pods will be scaled down, but only to a certain amount… but I only have ONE pod. So it doesn’t get scaled down at all, and the new pod is never able to scale up to replace it. So these settings must be changed.
But once this is done, I can patch the deployment to have extra ports going through:
postRenderers:
  - kustomize:
      patches:
        - patch: |
            - op:  add
              path: /spec/template/spec/containers/0/ports/-
              value:
                containerPort: 22
                hostPort: 22
                name: ssh
                protocol: TCP
          target:
            kind: Deployment
            name: ingress-nginx-controller
And then I can forward the tcp service via the ingress nginx controller, by following the ingress-nginx docs on this.
Related reddit post. It seems like even Istio has stimilar issues.
Another issue I encountered was “413 Request Entity Too Large” when trying to upload ISO’s to nginx. By default, nginx has a setting, client.max_body_size that limits the size of client requests, or in this case, the size of ISO’s that I can upload to Incus. To fix, you can add annotation that changes this setting.
Istio
So now, ingress nginx is being deprecated.
I have a few options, but I do think I have to switch off. One problem is almost all of the helm charts I use, create resources of type ingress. Thankfully, I have been very, very careful to intentionally avoid specifying what ingress class they use, meaning that all I really have to do is delete the ingress, and then I would iterate over the ingresses and delete their current ingress class. I have switched ingress class names before, and according to my testing, all it requires is that I delete the spec.ingressClassName resource from the ingress object, and then the ingress will work with the new cluster ingress.
So I want something that supports both ingress, and gateway API, in addition to that. Another fear I have, is that the annotations nginx uses may not be supported.
- Traefik
- relevant reddit comment
- Supports gateway api as well as ingress
- They are trying to make a compat layer for nginx’s annotations
- Cilium/Envoy
Both traefik and Cilium support gateway api.
Some big caveats:
- No support for oauth2-proxy, which I would want for auth.
I actually don’t think I am going to switch yet. The problem is that I don’t really want to use Traefik, but at the same time, Openstack-helm depends on ingress-nginx’s annotations.So I kinda just have to leave it for now.
Alright, it looks like openstack-helm has updated their helm charts to be able to use haproxy instead of ingress-nginx. They didn’t use any complicated annotaitons.
I won’t be migrating to gateway api, but I will shift to istio ingress instead of ingress-nginx.
I have deciced to deploy istio in ambient mode, instead of sidecar mode, because I can, but it does make things a bit more complex.
Ingress supports specifying TLS settings. This is supported by Istio, but the referenced Secret must exist in the namespace of the istio-ingressgateway deployment (typically istio-system). cert-manager can be used to generate these certificates.
From: https://istio.io/latest/docs/tasks/traffic-management/ingress/kubernetes-ingress/#tls
Unfortunately, this is a dealbreaker :(. I want something compatible with my existing kubernetes ingress stuff, and it currently I put the SSL certs in the same namesp
Since I already deployed istio in ambient mode, I will keep it deployed, but I won’t be using it as an ingress/gateway controller.
Traefik
And thus, we loop all the way around, to the ingress controller I originally discarded for ingress-nginx. Traefik is the current best option, because it currently supports gateway API, and ingress.
Installation was simpler, but then I had to remove the ingressClass set for all ingresses, so they would automatically use the default traefik ingress.
But, my custom Incus ingress setup didn’t work. So I had to migrate it to something else. I moved to traefik, and it was pretty easy.
Cert-Manager
I also didn’t think I would need to revisit cert-manager either. But for Coder, it needs a wildcard certificate for the service to deploy, and if you want a wildcard cert you need to use the DNS01 resolver, rather than the http01 one I am currently using.
I found a fork of a mainted cert-manager webhook that does nothing but add an OCI helm repo. Nice!
But it 403’s unless I pull by a specific tag, 1.03. In order for OCI support to work for this, I need to udpate flux, as flux 2.6 offers the OciRepository CRD in the official api (rather than just in the beta api). However, even after updating flux, these api’s still remain in beta.
Okay after waiting for a bit, it’s there. Sometimes the solution is patience.
But I decide to switch to the original version instead, after realizing that I can use a GitRepository to get the helm chart, and deploy the helm chart from a path in the git repository.
Nvidia Container Toolkit
So firstly, I need to install the Nvidia container runtime on kuberntes.
Here are the docs on the proprietary nvidia drivers.
Firstly, enable the nonfree repo:
/etc/apt/sources.list
#deb cdrom:[Debian GNU/Linux 12.10.0 _Bookworm_ - Official amd64 NETINST with firmware 20250315-10:09]/ bookworm contrib main non-free-firmware

deb http://deb.debian.org/debian/ bookworm main contrib non-free non-free-firmware
deb-src http://deb.debian.org/debian/ bookworm main contrib non-free non-free-firmware

deb http://security.debian.org/debian-security bookworm-security main contrib non-free non-free-firmware
deb-src http://security.debian.org/debian-security bookworm-security main contrib non-free non-free-firmware

# bookworm-updates, to get updates before a point release is made;
# see https://www.debian.org/doc/manuals/debian-reference/ch02.en.html#_updates_and_backports
deb http://deb.debian.org/debian/ bookworm-updates main contrib non-free non-free-firmware
deb-src http://deb.debian.org/debian/ bookworm-updates main contrib non-free non-free-firmware
apt install nvidia-driver firmware-misc-nonfree
Anyway, next is to install the Nvidia container toolkit, using the nvidia repo, and instructions from here.
curl -fsSL https://nvidia.github.io/libnvidia-container/gpgkey | sudo gpg --dearmor -o /usr/share/keyrings/nvidia-container-toolkit-keyring.gpg
/etc/apt/sources.list.d/nvidia-container-toolkit.list
deb [signed-by=/usr/share/keyrings/nvidia-container-toolkit-keyring.gpg] https://nvidia.github.io/libnvidia-container/stable/deb/$(ARCH) /
#deb [signed-by=/usr/share/keyrings/nvidia-container-toolkit-keyring.gpg] https://nvidia.github.io/libnvidia-container/experimental/deb/$(ARCH) /
apt update
apt install nvidia-container-toolkit
After this, I simply restart the rke2 service, and it the nvidia container runtime is autodetected and shows up in the /var/lib/rancher/rke2/agent/etc/containerd/config.toml file.
After this, I should be able to simply set nvidia as a runtime for certain pods, according to the k3s docs.
Another common step for Nvidia support in Kubernetes, is to install the Nvidia K8s device plugin, but this requires the Nvidia container runtime to be teh default. I don’t want this, because it gives services that don’t need an Nvidia GPU access to Nvidia GPU’s. I don’t think I need this, however, so I won’t bother.
But then I needed newer nvidia drivers. I followed nvidia’s network repo instructions to get a newer version of nvidia drivers on Debian 13.
And then to remove the older driver and update:
apt install cuda-drivers
This mostly works, but a config file in /etc/modprobe.d is not correct. It is /etc/modprobe.d/nvidia.conf.dpkg-new, which I had to rename to just /etc/modprobe.d/nvidia.conf in order for the nvidia drivers to work properly.
In addition to this, I have to regenerate the nvidia container runtime file for the new drivers.
nvidia-ctk cdi generate > /etc/cdi/nvidia.yaml
Storage
OpenEBS
Kubernetes storage is fairly complex, and I have encountered issues with it multiple times in the subprojects I have used, so I am moving them here to this section instead from where they originally where.
One concern I have is that PVC’s seem to get deleted when I delete the helm chart. This is despite the fact that I have a policy of Retain for the spcific persistentvolume class.
Uh oh. Upon further inspection, it seems that every PVC, even if they are deleted, the data stays there on the disk. This is somewhat concerning, as it means that nothing but manually deleting the volumes can be done. This isn’t really that big of an issue though.
Although, it seems that it’s not that PVC’s are being deleted, but instead that the persistenvolumes are not being rebound when the new iteration of openwebui/ollama are deployed. It looks like both create a persistentvolumeclaim by default, and you have to explicitly set if you would like to reuse an existing one. But first, I need to nuke all persistentvolumes.
[moonpie@cachyos-x8664 flux-config]$ kubectl get persistentvolume -n owui | grep owui | awk '{print $1}' > deadpvcs.txt
This feeds the name of all the dead pvc’s into a text file. Then, I will iterate over this to delete.
[moonpie@cachyos-x8664 flux-config]$ xargs -L 1 -I {} kubectl delete persistentvolumes "{}" < deadpvcs.txt
And then I have to delete the actual pvc from /var/openebs/persistent. On the remote server:
root@thoth:/var/openebs/persistent# xargs -L 1 -I {} rm -rf "{}" < deadpvcs.txt
[moonpie@cachyos-x8664 flux-config]$ kubectl get statefulsets.apps -A
NAMESPACE   NAME                     READY   AGE
authentik   authentik-postgresql     1/1     63d
authentik   authentik-redis-master   1/1     63d
coder       coder-pg-postgresql      1/1     62d
openfga     openfga-postgresql       1/1     51d
Okay. I think the issue is that only kubernetes statefulsets keep a pvc if you delete the pods. It looks like deployments, and replicasets don’t. I think the best option is to declare a seperate PVC and then point the helm charts of ollama and openwebui to them. I tried experiement with the pvc name itself, the pvc-0d7939f6-feaa-47cb-9b7f-9d0d359ab9c0 format, or the shortname, owui/open-webui, but neither work.
I rebooted and am trying to test if this is a one off issue by me installing longhorn.
[moonpie@cachyos-x8664 openwebui]$ kubectl get persistentvolumeclaims -n owui
NAME                   STATUS   VOLUME                                     CAPACITY   ACCESS MODES   STORAGECLASS                  VOLUMEATTRIBUTESCLASS   AGE
ollama                 Bound    pvc-73cd5afc-5a8c-4ffb-9b92-669ee5189870   30Gi       RWO            openebs-persistent-hostpath   <unset>                 6m18s
open-webui             Bound    pvc-4f5abcc0-cbe1-4809-a22c-49959d747900   2Gi        RWO            openebs-persistent-hostpath   <unset>                 6m19s
open-webui-pipelines   Bound    pvc-027c493b-aed8-4a42-a7bb-599b724835b3   2Gi        RWO            openebs-persistent-hostpath   <unset>                 6m19s
[moonpie@cachyos-x8664 openwebui]$ kubectl get persistentvolumeclaims -n owui
NAME STATUS VOLUME CAPACITY ACCESS MODES STORAGECLASS VOLUMEATTRIBUTESCLASS AGE
ollama Bound pvc-3efedee6-11c1-4f19-961d-b5fcbee4879f 30Gi RWO openebs-persistent-hostpath <unset> 25s
open-webui Bound pvc-4c68d492-bf04-455c-bb51-652bb4268234 2Gi RWO openebs-persistent-hostpath <unset> 25s
open-webui-pipelines Bound pvc-0f6ce1b4-8928-449d-8a05-a2006eb533c9 2Gi RWO openebs-persistent-hostpath <unset> 25sNext thing is to test that it is not unique to openwebui/ollama. It seems that this is related to openwebui being a deployment, but not having an easy way to pin the persistent volume for deployments is annoying.
I tried with a persistentvolume at first, but apparently it wants a full persistentvolumeclaim instead. (openwebui)
After this issue, I start working on the openstack with cinder and openebs-lvm for those.
First I carved out a 2TB partition on the disk (using cockpit). Then:
root@thoth:~# pvcreate /dev/sde1

root@thoth:~# vgcreate cinder-volumes /dev/sde1
Longhorn
On the host system:
apt install open-iscsi
I did have to uninstall for testing purposes, where you have to set a deletion confirmation flag.
kubectl -n longhorn-system edit settings.longhorn.io deleting-confirmation-flag
Issues Todo
Todo in the meantime:
Due to an issue with openebs not deleted host folders are deleted when PV’s are deleted, I decided to use openebs-lvm instead. So my layout is the 4 TB disk has another parition allocated, on which I have another lvm partition, with it’s own volume group.
/var/lib/rancher/rke2/agent/containerd/io.containerd.snapshotter.v1.overlayfs is eating up all my disk space.
Carrying on with ceph, I have decided it is probably best to use it as a default for my system.
Networking
I install rke2 again, (due to my SSD dying), and my pods cannot do any form of more complex networking. They can ping each other and external sites, but they cannot wget or use any other protocols. They also can’t use DNS, but I am assuming that is because the coredns fails to start because of this issue.
Maybe what’s missing is iptables?
apt install iptables — the version that debian comes with is actually a wrapper for nftables.
I have decided to switch to Cilium and istio, to prepare for a potential kubeflow deployment.
/etc/rancher/rke2/config.yaml
disable:
  # Yeah so apparently this was kind of important.
  # - rke2-coredns
  - rke2-ingress-nginx
cni:
  - multus
  - cilium
I encountered some issues, so I started by nuking /etc/cni and /var/lib/cni (well actually, moving them to a backup). But I still had issues, specifically this one.
To fix, I adjusted the config:
apiVersion: helm.cattle.io/v1
kind: HelmChartConfig
metadata:
  name: rke2-cilium
  namespace: kube-system
spec:
  valuesContent: |-
    kubeProxyReplacement: true
    socketLB:
      hostNamespaceOnly: true
    cluster:
      name: "default"
      id: 0
    cni:
      exclusive: false
    hostFirewall:
      enabled: false
    envoy:
      prometheus:
        enabled: false
    bpf:
      monitorAggregation: medium
      monitorAggregationInterval: 5s
    l2announcements:
      enabled: false
    tunnelProtocol: geneve
    operator:
      replicas: 1
      updateStrategy:
        type: RollingUpdate
        rollingUpdate:
          maxSurge: 100%
          maxUnavailable: 100%
I get further errors, probably because I have a weird bridge setup and cilium doesn’t know what to do:
routingMode: native
nodePort:
  directRoutingDevice: eth0
Still errors. I needed something different:
extraConfig:
  #direct-routing-device: "eth0"
  devices: "eth0"
And then I enable the host firewall, and have a deny by default firewall. Of course, before doing this I apply a configuration that gives me access, so I don’t lock myself out.
IP address change
In order to fix this error, which appears after changing my ip address:
May 28 20:45:34 thoth rke2[6657]: time="2025-05-28T20:45:34-07:00" level=info msg="Datastore using 7925760 of 7933952 bytes after defragment"
May 28 20:45:34 thoth rke2[6657]: time="2025-05-28T20:45:34-07:00" level=info msg="Failed to test data store connection: this server is a not a member of the etcd cluster. Found [thoth-4d3eb158=https://130.166.90.206:2380], expect: thoth-4d3eb158=https://130.166.79.34:2380"
After changing my ip address, you just need:
systemctl stop rke2-server
rke2 server --cluster-reset
systemctl restart rke2-server
I also had to replicate this process again when I moved to a different dorm from fall for my summer dorm.
Useful Stuff For the Future
One of my current frustrations is that Autehntik is not fully GitOps right now, and instead I am configuring it through the UI. But authentik has a terraform provider which, when combined with this Flux OpenTofu setup, would allow me to GitOps the authentik config as well.
Another option, now built in to authentik is authentik blueprints, which work with just the helm chart.
Backups:
- https://velero.io/ — backups
- Hmm, it seems they removed the docs on rclone integration in the latest version of their docs
- https://github.com/otwld/velero-ui
- https://stash.run/docs/v2025.6.30/welcome/
- seems to have rclone integration
Monitoring:
- Prometheus/Grafana
Add ssh keys in authentik: https://github.com/goauthentik/authentik/issues/2145
https://kamaji.clastix.io/getting-started/kamaji-kind/
Kamaji is a virtual cluster setup, but unlike the similar vcluster, it seems to allow for different CNI’s to be used in tenant clusters. I think this could be usefult o deploy openstack, openshift, or harvester, inside my actual cluster, in such a way that it doesn’t break my existing configuration.
Openstack
Yeah. I looked at some deployment options.
It should be noted that I have gitops as a requirement, so kolla-ansible, and genestack have been ruled out.
- (Upstream of) Red Hat Openstack Services on Openshift
- Yet another openstack on kubernetes
- Mirantis Rockoon
- Upstream of Mirantis Openstack on Kubernetes
- Most all in one, where it’s a single “openstackdeployment” custom resource
- Openstack-helm
- I am probably going to use openstack-helm again
Basics of what I want:
Keystone mappings — these let me automatically create projects per user and group, which is one of the features I want.
And then it looks like cinder CANNOT use a pvc to deploy storage, instead it must manage it’s own storage backend pretty much. So the most popular option is ceph, but I had trouble installing that due to the fact that my “cluster” is only a single node. I could use a virtual machine, like on Incus, but I don’t really want to do that.
As far as I can tell, I only really have two (viable) options
Rook-ceph
- Rook-ceph (single node)
- Ceph (single node)
- LVM backend
Hmmm.
Also, I have only 4 days to do this.
First I will try rook-ceph again, to make sure there wasn’t anything obvious I missed.
https://rook.io/docs/rook/latest-release/Getting-Started/intro/
I think another thing I missed was that ceph wants a storage system that exposes block volumes, which my openebs-persistent-hostpath cannot do. But longhorn can! So I will create a storage class just for ceph.
Here is Openstack-helms test script for deploying ceph.
I copied something similar and got it working. But after a reboot, I noticed that my disk devices had been moved around. :/ To avoid this, I should reference the disk device by part-id or by it’s path. Both of these can be found by typing ls -l in /dev/disk/by-id or /dev/disk/by-path, which shows the id or path as a file that is a symlink to the “standard” way of referring to disk devices.
2025-11-17 06:40:12.025816 I | ceph-cluster-controller: skipping orchestration for cluster object "ceph" in namespace "ceph" because its cleanup policy is set
I got this error because I tried to set confirmation: yes-really-destroy-data in the ceph config when I install it, so I could skip a step. I was not as clever as I thought.
Cleanup
Also, when I need to nuke ceph, the cleanup of the ceph cluster requires some manual steps.
First delete the object store and ceph block store. I had to edit them, removing the finalizers in order for them to delete properly. Then I have to rm -rf /var/lib/rook to delete the data directory on the host.
First thing, first, edit the cephcluster customresources deletion policy.
kubectl -n rook-ceph patch cephcluster rook-ceph --type merge -p '{"spec":{"cleanupPolicy":{"confirmation":"yes-really-destroy-data"}}}'
Then, delete the cephcluster cr. It might not work, so you might have to delete the ceph objecstore and cephblockpool objects in ceph.
Actually, it’s easier to just nuke the entire ceph and rook-ceph namespaces.
Then kubectl edit clientprofiles.csi.ceph.io -n rook-ceph ceph and remove the finalizer, because it doesn’t delete properly.
On the host, wipe the disk and rm -rf /var/lib/rook. Also, format the disk device:
https://rook.io/docs/rook/latest/Getting-Started/ceph-teardown/?h=cleanu#zapping-devices
sgdisk --zap-all /dev/disk/by-id/ata-WDC_WD40EZAX-00C8UB0_WD-WX22D556K14P
partprobe /dev/disk/by-id/ata-WDC_WD40EZAX-00C8UB0_WD-WX22D556K14P
kubectl get crd | grep ceph | awk '{print $1}' | xargs kubectl delete crd
Openstack install (cont)
Firstly, I have to label the nodes, since openstack won’t schedule pods on nodes that aren’t explicitly labeled to have those workloads.
I also had to add one more label to make ovn work:
kubectl label --overwrite nodes --all openstack-network-node=enabled
I also need to install lioadm for openstack cinder, since it needs either that or tgtadm (although the former seems to be better).
root@thoth:/# apt install python3-rtslib-fb targetcli-fb
And then for neutron/nova, I have to create ANOTHER veth device, since the one I have is already being used for Incus.
root@thoth:/t# nmcli con add type veth ifname veth2 con-name veth2 veth.peer eth2
And then I go into cockpit and add veth2 as a port to my bridge, but disable autoconfiguration of eth2.
I’m getting an error when I attempt to deploy neutron:
2025-09-18 17:11:54.899 67 CRITICAL neutron.plugins.ml2.managers [-] The following mechanism drivers were not found: {'linuxbridge'}                                                                                             │
│ The following mechanism drivers were not found: {'linuxbridge'}
It turns out that linuxbridge has been removed.
So I try OVN instead.
root@thoth:/# apt install openvswitch-switch python3-openvswitch
root@thoth:/# systemctl disable --now openvswitch-switch.service
And then I rebooted the node, just to be safe.
I hit a bug when attempting to deploy ovn.
NotFoundException: 404: Client Error for url: https://neutron.my-cluster.whatever/v2.0/networks, AvailabilityZone nova could not be found.
I figure out that this is a bug by finding a slack message in the #openstack-helm channel.
Hi, I see this commit has been merged last week, but this is breaking neutron-server on 2024.1 (fresh) deployment. After neutron-server starts, when I try to create a network (for Octavia deployment) I get the message below
Which then leads me to this bug report for ovn.
So I disable OVN and switch to normal openvswitch (default lmao) and it works.
Next up is the ingress controller. One of the metadata services fails to start, because I didn’t bother to deploy a kubernetes ingress in the openstack namespace.
After digging through some messages on slack, it looks like openstack-helm expects for two ingress classes to exist. One is “nginx-cluster”, and another is just “nginx”, where they have a cluster ingress and one that is “namespace scoped” (but not really.). So I first rename my existing ingress class from nginx to nginx-cluster, and then I recreate another ingress, inside the openstack namespace, following the openstack-helm install docs.
Why are two ingresses required? Why not just one cluster ingress?
Well, according to some messages in the Slack, this is a very easy way to achieve TLS between all the services. All the services get an internal ingress, and that uses tls certs, and then the internal traffic cluster stays encrypted. But I would probably rather have an actual service mesh like istio or cilium that provides mtls for services.
Also, I give up on my goal of not deploying ceph. It seems that they only bother to test/document the most common use cases, which is ceph in this case. Trying to use cinder directly for LVM just isn’t working, but now at least I know how to deploy ceph on a single node…
Another thing I need to set up is keystone with OIDC for authentication. I found an example for doing so with openstack-helm. I also found an article on medium (archive).
I start by attempting to rotate all the credentials in use, by putting them in a single secret that flux reads using valuesFrom, but it doesn’t work:
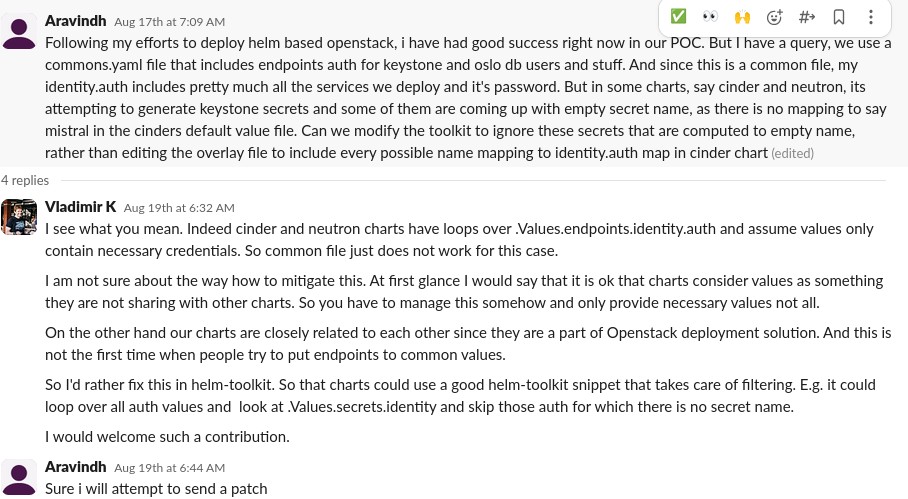
It was probably better to use Flux’s Kustomizations and their variable substitutions anyways. I use a github codesearch to find examples of other people with similar setups to copy.
Another frustration is that the ingresses are not getting the certificates they are supposed to get. Instead, they get the kubernetes default certificate. I am copying the format used in rackspace’s understack, and the certificate is not there. But at least the endpoints are being exposed publicly.
Another current problem, is that jobs are not always recreated when I reapply the helm charts. I asked about this on the openstack-helm slack, and I got:
Because they don’t mutate so they don’t get re-created. Cause they are suppose to go away after a run based on their annotations.
But I don’t undestand why if I delete all the jobs and delete the helm release, then the jobs still do not come back. Is there some other form of tracking whether or not jobs have ran? I may have to end up nuking the whole thing and starting over, which is frustrating. I at least wanted to leave the backing infra up (mariadb, rabbitmq, memcached, libvirt), because I have figured those out and how to rotate passwords there.
After some investigation, it’s that one of the jobs fails. Of course, it still shows “completed”, but the containers went into crashloopbackoffs. They are failing to connect to the database server.
/ # mysql -h mariadb.openstack -u nova -p --skip-ssl nova
mysql: Deprecated program name. It will be removed in a future release, use '/usr/bin/mariadb' instead
Enter password:
Welcome to the MariaDB monitor.  Commands end with ; or \g.
Your MariaDB connection id is 2602
Server version: 10.11.6-MariaDB-1:10.11.6+maria~ubu2204 mariadb.org binary distribution

Copyright (c) 2000, 2018, Oracle, MariaDB Corporation Ab and others.

Type 'help;' or '\h' for help. Type '\c' to clear the current input statement.

MariaDB [nova]>
Note that I have to skip ssl connections. But it works otherwise.
I did figure out the problem, that Nova had extra database connections I was missing. Once I added oslo_cell0 and oslo_nova_api to the endpoints, it worked with the correct passowrd.
Next things I need to figure out:
- Ingresses
- Public ingresses for glance and cinder
- Getting TLS certs for those public ingresses
- SSO
- Does horizon or keystone do it?
- Keystone mappings
- Cinder not deployed yet
- Nova, try to get serial console in addition to novnc console
- I don’t know if this is possible, plus windows users would still need rdp in order to get their remote desktop. Although I could do terraform + a coder agent for environments in their project?
- Probably will take too long
Okay. Cinder deployment is done. That was pretty easy, all I had to do was delete the client key secret that the ceph adapter jobs create. Once that is done, cinder finds the ceph deployment and can create volumes there.
I also don’t know if glance and cinder are supposed to have public endpoints, and instead if the requests to them are proxied through Horizon or something like that. But when I try to upload an image, it just stays on queuing and doesn’t activates.
I am probably going to give up on the serial console and try to do VPNaaS of some sort instead. Either via openstack, or I could use netbird.
Keystone
Next is SSO. So my understanding is a few things.
Firstly, Keystone does “federation”, which is backed by multiple identity providers. It can be ldap, oidc/saml, or even another keystone. In this case I want SAML. Horizon has knobs to enable it to see those and offer them as an option.
Secondly, keystone does Openid connect via mod_auth_openid — but it’s not included in all versions of the keystone container. It’s not in the default container, or the starlingx container, or rackerlab’s genestack container. I only found a version that included it via rackerlab’s understack container.
But, the understack containers latest version is 2024.2, whereas I am on the 2025.1 release. So I have two options for this:
- Modify the container to include mod auth
- I’m probably going to do this, because it’s simple.
- I’m probably going to do this, because it’s simple.
- Use a proxy in front that has openid auth
- Maybe saml is supported?
Also, I suspect the way that image overriding is so trivial is to account for usecases like this.
I tracked down how the images are built. They are built using a tool openstack loci, which seems to be fairly flexible. I think if I feed it a “DIST_PACKAGES” argument after feeding it the prerequisite builds, I can have something that comes with mod_oauth installed. I could then push this to my kubernetes cluster, tag it, and have my openstack helm deployment use that.
podman build . -f Dockerfile.base --build-arg FROM:ubuntu:noble --build-arg CEPH_REPO='deb https://download.ceph.com/debian-reef/ jammy main' --tag base:ubuntu_noble

podman build . -f Dockerfile --target requirements --build-arg FROM=base:ubuntu_noble --build-arg PROJECT=requirements --tag requirements:master-ubuntu_noble


ERROR: Could not open requirements file: [Errno 2] No such file or directory: '""'
Error: building at STEP "RUN /opt/loci/scripts/install.sh": while running runtime: exit status 1
And then this errors. I will try docker.
---> 583b9bca7698
Step 44/44 : RUN /opt/loci/scripts/install.sh
 ---> Running in 57eb5670a12d
+ source /etc/lsb-release
++ DISTRIB_ID=Ubuntu
++ DISTRIB_RELEASE=22.04
++ DISTRIB_CODENAME=jammy
++ DISTRIB_DESCRIPTION='Ubuntu 22.04.5 LTS'
+ export LC_CTYPE=C.UTF-8
+ LC_CTYPE=C.UTF-8
+ echo 'APT::Get::AllowUnauthenticated "true";'
+ mv /etc/apt/sources.list /etc/apt/sources.list.bak
+ cat
+ apt-get update
E: Malformed entry 1 in list file /etc/apt/sources.list (URI parse)
E: The list of sources could not be read.
The command '/bin/sh -c /opt/loci/scripts/install.sh' returned a non-zero code: 100
[moonpie@cachyos-x8664 loci]$ docker build . -f Dockerfile --target requirements --build-arg FROM=base:ubuntu_noble
Docker also errors on the second step, albeit for a different reason. This is somewhat strange, because I should be trying to use Ubuntu noble rather than jammy.
Or… I could just do what understack actually did which was literally just installing mod auth openid. From their dockerfile.
# syntax=docker/dockerfile:1

ARG OPENSTACK_VERSION="required_argument"
FROM quay.io/airshipit/keystone:${OPENSTACK_VERSION}-ubuntu_jammy

ADD --checksum=sha256:deb52ea8304a41ee0331e4ba87a9f82ff643464b6d34084e161f58ec11c25a69 https://github.com/OpenIDC/mod_auth_openidc/releases/download/v2.4.16.5/libapache2-mod-auth-openidc_2.4.16.5-1.jammy_amd64.deb /tmp

RUN apt-get update && \
    apt-get install -y --no-install-recommends \
        /tmp/libapache2-mod-auth-openidc_2.4.16.5-1.jammy_amd64.deb \
    && apt-get clean && rm -rf /var/lib/apt/lists/* /tmp/*.deb
I think the simplest thing is to clone this and then push it to Dockerhub, and then use that one. ALthough one thing I am concerned about is that the version in the Ubuntu Noble resources seems to use be an older version than the one they get.
root@b0fd9560e5c2:/# apt search libapache2-mod-auth-openidc
Sorting... Done
Full Text Search... Done
libapache2-mod-auth-openidc/noble-updates,noble-security 2.4.15.1-1ubuntu0.1 amd64
  OpenID Connect Relying Party implementation for Apache
# syntax=docker/dockerfile:1
FROM quay.io/airshipit/keystone:2025.1-ubuntu_noble
RUN apt-get update && \
apt-get install -y --no-install-recommends libapache2-mod-auth-openidc \
&& apt-get clean && rm -rf /var/lib/apt/lists/* /tmp/*.debI then push this image to dockerhub. It can be found here.
Then, the next thing is to set up keystone federation.
This one was actuall pretty easy to do. After putting a sample mapping in, it worked.
openstack identity provider create --remote-id https://idp.moonpiedumpl.ing/app openstack openid
Create a mapping.
openstack federation protocol create openid --mapping openid_mapping --identity-provider openid
I get an error now, because the helm chart version updated but the container didn’t. I am on
Relevant:
https://docs.openstack.org/releasenotes/openstack-helm/current.html
https://opendev.org/openstack/openstack-helm/commit/b2a515d52d37832317e63b3942157f8b1f1689b4
So to fix this, I think the only real option is ensure that the chart version and the container version are in sync. I have two options
- Downgrade all charts to 2025.1
- I tested with the keystone chart, and it seems to work
- Upgrade all containers to 2025.2
I really like the appeal of the latter, because 2025.2 is supported until right after 2027, when I graduate. This means that I could deploy openstack and not touch it, simply destroying it when I need to leave college.
Okay, I updated the keystone helm chart to version 2025.2, but I still get the error. :(.
Okay I fixed it. I needed to update the keystone wsgi conf template, as that was still outdated.
Nova
And then I get this error in my nova container.
+ exec nova-compute --config-file /etc/nova/nova.conf --config-file /tmp/pod-shared/nova-console.conf --config-file /tmp/pod-shared/nova-libvirt.conf --config-file /tmp/pod-shared/nova-compute-fqdn.conf --config-file /tmp/pod-shared /nova-hypervisor.conf --config-dir /etc/nova/nova.conf.d 2025-10-01 21:33:31.610 2068907 INFO nova.virt.driver [None req-949165f9-c5bc-4527-af02-15ad7ab73875 - - - - - -] Lo ading compute driver 'libvirt.LibvirtDriver' 2025-10-01 21:33:32.074 2068907 INFO nova.compute.provider_config [None req-949165f9-c5bc-4527-af02-15ad7ab73875 - - - - - -[] No provider configs found in /etc/nova/provider_config/. If files are present, ensure the Nova process has access. 2025-10-01 21:33:32.597 2068907 INFO nova.service [-] Starting compute node (version 31.1.1) libvirt: error : internal error: could not initialize domain event timer 2025-10-01 21:33:33.112 2068907 WARNING nova.virt.libvirt.host [None req-d6e2b665-7aa3-4f75-bc91-8e7c07d7536a - - - - -[] URI qemu+unix:///system?socket=/run/libvirt/libvirt-sock does not support events: internal error: could not i nitialize domain event timer: libvirt.libvirtError: internal error: could not initialize domain event timerThis issue is most likely caused by a mismatch of the libvirtd in the libvirt container and the libvirt-python that is being used in the
<<K9s-Shell>> Pod: openstack/libvirt-libvirt-default-rzp2k | Container: libvirt
root@thoth:/# libvirtd --version
libvirtd (libvirt) 10.0.0
<<K9s-Shell>> Pod: openstack/nova-compute-default-6ls4j | Container: nova-compute
nova@thoth:/$ pip show libvirt-python
Name: libvirt-python
Version: 11.0.0
Summary: The libvirt virtualization API python binding
Home-page: http://www.libvirt.org
Author:
Author-email:
License:
Location: /var/lib/openstack/lib/python3.12/site-packages
Requires:
Required-by:I find this kinda weird because I am using 2025.1 for both. But actually, upon further investigation, when I download older images of nova, they all still have libvirt-python 11.0.
I think this issue could also be similar to something I had with OVN earlier on, where /run is mounted into the container and it keeps the sockets and other cruft from the deleted containers.
I found the pinned requirements, and it looks like even 7 months ago the version of libvirt-python in use was still 10.
The issue has to be seperate from that. One concern I have is that my host’s system is too old — I haven’t updated to the current Debian Trixie yet, I am still on bookworm.
Okay. I updated to Trixie. No dice.
Next, I change edit the daemonset, changing the command to tail -f /dev/null, changing the filesystem to be writable, and the user it runs as to be root.
...
command:
  - tail
  - -f
  - /dev/null
...
securityContext:
  privileged: true
  readOnlyRootFilesystem: false
  runAsUser: 0
I test to see if virsh can connect without complaining, which is seems to be able to .
Meanwhile, I spot this in libvirt logs.
2025-10-02 22:32:22.949+0000: 1577326: error : dnsmasqCapsNewFromBinary:672 : Unable to find 'dnsmasq' binary in $PATH: No such file or directory
2025-10-02 22:32:25.043+0000: 1577449: info : libvirt version: 10.0.0, package: 10.0.0-2ubuntu8.6 (Ubuntu)
2025-10-02 22:32:25.043+0000: 1577449: info : hostname: thoth
2025-10-02 22:32:25.043+0000: 1577449: error : dnsmasqCapsNewFromBinary:672 : Unable to find 'dnsmasq' binary in $PATH: No such file or directory
Although installing dnsmasq on the host doesn’t really do anything.
I also see more errors after I start nova:
2025-10-03 12:01:24.689+0000: 3156564: error : dnsmasqCapsNewFromBinary:672 : Unable to find 'dnsmasq' binary in $PATH: No such file or directory
2025-10-03 12:05:13.111+0000: 3156520: error : virNetSocketReadWire:1781 : End of file while reading data: Input/output error
2025-10-03 12:05:24.116+0000: 3156520: error : virNetSocketReadWire:1781 : End of file while reading data: Input/output error
2025-10-03 12:05:53.393+0000: 3156520: error : virNetSocketReadWire:1781 : End of file while reading data: Input/output error
^[[B2025-10-03 12:06:35.354+0000: 3156520: error : virNetSocketReadWire:1781 : End of file while reading data: Input/output error
2025-10-03 12:07:30.381+0000: 3156520: error : virNetSocketReadWire:1781 : End of file while reading data: Input/output error
But apparently, these are harmless.
This is the feedback from Libvirt developers. The socket connection to libvirtd / other daemons was abruptly closed. Essentially you can almost always ignore this error message as being mostly harmless.
The problem was that some cruft wasn’t getting deleted, but interfered with a new run. I had to delete the /etc/libvirt and /run/libvirt directories from the host.
Novnc
It is possible to modify the container and add copy and paste: https://www.reddit.com/r/openstack/comments/1nueogz/the_solution_to_novnc_copy_paste_for_kolla/
https://github.com/Vishwamithra37/galam_nonvc_copypaste/tree/CopyPasteWorking_NoVnc_OpenStack
However, I discover something very disappointing in my testing:
[moonpie@cachyos-x8664 flux-config]$ nmap -A 130.166.84.86
Starting Nmap 7.98 ( https://nmap.org ) at 2025-10-09 22:14 -0700
Nmap scan report for s084n086.csun.edu (130.166.84.86)
Host is up (0.0076s latency).
Not shown: 990 closed tcp ports (conn-refused)
PORT     STATE    SERVICE      VERSION
22/tcp   open     ssh          Golang x/crypto/ssh server (protocol 2.0)
| ssh-hostkey:
|_  4096 97:2f:18:c7:7c:b4:7e:72:55:02:6e:d9:46:7c:33:69 (RSA)
80/tcp   open     http         nginx (reverse proxy)
443/tcp  open     ssl/http     nginx (reverse proxy)
|_ssl-date: TLS randomness does not represent time
| ssl-cert: Subject: commonName=Kubernetes Ingress Controller Fake Certificate/organizationName=Acme Co
| Subject Alternative Name: DNS:ingress.local
| Not valid before: 2025-10-07T17:00:03
|_Not valid after:  2026-10-07T17:00:03
|_http-title: 404 Not Found
445/tcp  filtered microsoft-ds
3300/tcp open     ceph         Ceph distributed filesystem msgr2 protocol
5900/tcp open     vnc          VNC (protocol 3.8)
| vnc-info:
|   Protocol version: 3.8
|   Security types:
|     None (1)
|_  WARNING: Server does not require authentication
6789/tcp open     ceph         Ceph distributed filesystem protocol v027 (ipv4)
8080/tcp open     http         FRITZ!Box TR-069 service
|_http-server-header: Ceph Object Gateway (squid)
|_http-open-proxy: Proxy might be redirecting requests
8443/tcp open     ssl/http     LXD container manager REST API
|_http-title: Site doesn't have a title (application/json).
|_ssl-date: TLS randomness does not represent time
| ssl-cert: Subject: commonName=root@thoth/organizationName=Linux Containers
| Subject Alternative Name: DNS:thoth, IP Address:127.0.0.1, IP Address:0:0:0:0:0:0:0:1
| Not valid before: 2025-10-07T17:10:18
|_Not valid after:  2035-10-05T17:10:18
9091/tcp open     http         Golang net/http server (Go-IPFS json-rpc or InfluxDB API)
Service Info: Device: broadband router

Service detection performed. Please report any incorrect results at https://nmap.org/submit/ .
Nmap done: 1 IP address (1 host up) scanned in 50.35 seconds
There is an unauthenticated, unencrypted VNC server on my server. And sure enough, when I connect to it, I am greeted with the interface of the test virtual machine I have created.
It seems that the novnc-proxy pod uses host networking by default, and you have to disable via values in the helm chart. And the VNC server is still exposed :/.
One thing I need to test is if pods can access services on the host that are only served on localhost.
Okay, there is an easier way to do this. I could also encrypt the traffic with tls certs, and use the certificate for authentication to the VNC service. This seems to be fairly simple, and wouldn’t require any complex changes to the kubernetes networking config.
There is an openstack-helm commit where they officially added support for this.
The values I want look pretty easy, but it does look like I need to spin up a self signed certificate authority and certificate. I do that, and then it still doesn’t connect. It looks like I failed to configure novnc to expect https, and was expecting http instead. I found the relevant endpoints config, in openstack atmosphere’s code.
Another thing I want to do is to deploy the serial console in addition to the novnc console. This is difficult because the nova helm chart only supports one console kind at a time, but I think a potential way I could get around this is by deploying nova twice, but disabling all the manifests except for the relevant ones I care about.
Oh, and here is the cloud-init config I use to give the Rocky server a default username and password. This only works when I select “configuration drive”, probably for reasons similar to the issues I was having with Incus. I just wanted an operating system that came with NetworkManager by default, as I have the most familiarity with the internals of that as opposed to other solutions.
#cloud-config
users:
  - name: myuser
    plain_text_passwd: "mypassword"
    lock_passwd: false
    shell: /bin/bash
    groups: sudo
    sudo: ['ALL=(ALL) ALL']
    ssh_pwauth: true
Neutron
I started with Linuxbridge, which errored. It turns out that linuxbridge was removed, which sucks because Linuxbridge was in the kernel, whereas OVS required an extra (albeit default), component.
With OVS, I did something from the UI, but I seem to have something that works.
But interestingly, what floating ip’s do is get IP addresses via DHCP. Then, you can give it to a virtual machine via a NAT setup. This is a really appealing setup to me, because it means I could give users only access to internal subnets, then me or other administrators could assign indivual virtual machines public ip’s for things like public services members want to host, or vpn access into internal subnets.
Right now, I am having trouble, because any vm’s I attempt to put on the provider network, do not actaully get an ip address. They report as having one, but I cannot ping them and they don’t have internet access.
Intestlingly enough, when I put a router on the provider network, I could ping it. And when I deleted that router I could no longer ping it. But any vm’s I created on NATed subnets behind that router had no internet access either, which is weird. It could be a default route issue?
One possibility is firewall rules. The default security group doesn’t allow for any traffic to on the ingress, only egress. Disabling this still had issues, but I think I am a step in the right direction.
Next thing to consider is port security. Port security is typically good where you control the subnet, as it ensures that ports attatched to VM’s only get the ip address you want them to have. But it probably breaks things if you try to access an external dhcp server, as the virtual machine tries to change it’s own ip address after figuring out what has been assigned.
So after some research, it looks like neutron is responsible for assigning ip addresses, and it uses port security to ensure that virtual machines get the correct one. So I try to create a “port” that is free from those restrictions, and get this:
(venv) [moonpie@cachyos-x8664 openstack]$ openstack server add port testlocal vm-bridge
BadRequestException: 400: Client Error for url: https://nova.openstack.moonpiedumpl.ing/v2.1/7edd8553fb2f46bb86e33d4a67249cf6/servers/4f64ca58-4716-42f1-8974-e58dc353064c/os-interface, Network requires port_security_enabled and subnet associated in order to apply security groups.
What I’m trying to do is to put a router/firewall type operating system in front of a the subnet so that I can just attatch ports to that network with the same controls.
As a backup plan, I could also consider replicating what libvirt does for it’s NAT based networking and then using that as an external bridge. VM’s would get traffic forwarded through to the main interface. No public VM’s though.
Although this gives me another interesting idea. What if I just put them on an Incus bridge? Although sadly, linuxbridge isn’t supported, but Incus does seem to be able to create an openvswitch bridge. This also might explain why the undercloud-overcloud setup is popular.
And if I do this, I could use Incus’s network forwards with a veth in order to have public virtual machines on this subnet.
Okay, but when I put a Rocky Linux virtual machine on the public subnet, it does in fact get an IP address. And internet! DNS doesn’t work but that’s okay.
Except, this IP address was not given via DHCP. It looks liike openstack assigned it a static ip address, using cloud-init. But the static ip address does work… it’s just not what I want. But, this should if I am using Incus’s NATed bridge, since I do have control over that network.
It looks like, since I disabled DHCP, the ip address was given to the Rocky server via Cloud Init and a static ip address instead. So, I enable automatic networking in the NetworkManager config, and now the virtaul machine does not get internet at all.
Two possible causes:
- Security Groups preventing ingress DHCP traffic
- But I enabled accepting all ingress traffic
- And then I disabled the ingress group
- Port security
- Probably this, when I attempt to disable port security, it just fails and doesn’t change anything.
It seems that it’s somewhat difficult to disable port security if you are simply adding a virtual machine to a network. I have to explicitly create a port attached to the network.
Another option is a “dhcp relay”. Neutron gets dhcp from the external subnet, before passing them onto it. But it’s not supported, all I can find is some scaffolding for it, but no working code. Despite the fact that this claims the feauture is implemented in OVN, I can’t find any related documentation.
What I am thinking of doing is twofold:
- Use an allocation range of IP addresses from .30-.69 from the public subnet (this seems to be the range not given out via DHCP)
- And use a NATe’d OVN Incus network.
The problem is that openstack really wants each project to have it’s own router on an external subnet. In theory I could do double NAT or things like that, but that breaks floating ip address setups. But with this setup, I have two external networks, one with 255 addresses, and one with 49 ip addresses.
I created a bridge using the Incus UI. Here is the yaml config of the Incus network, so I can easily recreate it. Although I have to restart incus in between openstack destroys and installs.
project: default
name: br-inc
description: For openstack
type: bridge
config:
  bridge.driver: openvswitch
  ipv4.address: 10.88.0.1/24
  ipv4.dhcp: 'false'
  ipv4.nat: 'true'
  ipv6.address: none
And then after I enable ICMP traffic through the default security group, I am able to ping the virtual machine on the Incus network, and vice versa. But only the Incus virtual machine gets traffic through to the internet, the openstack virtual machine does not.
Testing:
- Not security groups/ACL’s on either side
- Not ipv4 forwarding
- Traffic other than ICMP can go from incus virtual machine to openstack vm and vice versa.
- Promiscious mode was enabled for br-inc, but nothing else yet
One possibility I am thinking of is that traffic from openstack doesn’t leave the subnet, but instead routes from another bridge, into br-inc, where it gets stuck. It looks like openstack doesn’t directly attatch
Two other possibilites:
- Iptables rules created by canal get in the way
- I should try cilium instead, which uses epbf for it’s rules
- Networkmanager attempts to manage the ovs bridges when it shouldn’t be
- When I look into the NetworkManager UI of cockpit, it looks like networkmanager is attempting to manage some openstack virtual ports
Instead I’m gonna try something different. I’m gonna create another veth, and put an incus linux bridge on that veth, and then connect it to an openstack
It’s probably not the CNI, because it looks like Calico (which is like the default Canal that RKE2 uses but more), was supported and worked fine with openstack-helm.
Okay, again the issue is cruft caused by a lack of proper cleanup. It looks like the openvswitch bridges aren’t actually deleted, and this causes issues with initialization. But when I clean everything up and reboot, I can get internet access now on my virtual machines.
But, only with the external subnet, the incus internal subnet does not work. I dig through config, and NetworkManager seesm to have saved config for the ports attatched to the openstack bridge. I found a relevant issue, and it does look like NetworkManager clobbers tap devices. Interestingly, networkmangaer does not touch openstack’s openvswtich bridges, or incus’ bridges.
root@thoth:/sys/class/net/br-int# ethtool -i qvof1f97de8-c2
driver: veth
version: 1.0
firmware-version:
expansion-rom-version:
bus-info:
supports-statistics: yes
supports-test: no
supports-eeprom-access: no
supports-register-dump: no
supports-priv-flags: no
So I need a config file to remind networkmanager to not touch my precious devices:

```{.ini path='/etc/NetworkManager/conf.d/openstack-ovs.conf'}
[keyfile]
unmanaged-devices=interface-name:tap*;interface-name:qbr*;interface-name:qvo*
And then, I am able to put a router on both the incus and/or the external network, and that router can give internal networks internet. However, floating ip’s, or putting a virtual machine directly on the Incus network don’t work. They do work with the real external network, but I would like both working.
So what could be going wrong here? It’s probably Incus attempting to manage the networking of the openstack virtual machines, causing it to not get a connection.
Okay I get another error when I attempt to create a network:
2025-11-28 04:12:11.537962 /var/lib/openstack/lib/python3.12/site-packages/oslo_policy/policy.py:1133: UserWarning: Policy "create_network:shared": "rule:admin_only" failed scope check. The token used to make the request was domain scoped but the policy requires ['project'] scope. This behavior may change in the future where using the intended scope is required
2025-11-28 04:12:11.537980   warnings.warn(msg)
2025-11-29 11:12:46.315134 2025-11-29 11:12:46.312 20 ERROR keystone.server.flask.application oslo_policy.policy.InvalidScope: "identity:list_application_credentials": "(rule:admin_required) or (role:reader and system_scope:all) or rule:owner" requires a scope of ['system', 'project'], request was made with domain scope.Okay, it looks like the cli still works at least. The problem is that horizon gives me a “domain” scoped token, which is more than project scoped tasks want, but at the same time is not the universal administrator that a system scoped token would give me.
openstack network create --external --provider-network-type flat --provider-physical-network public --share public
woops I forgot to set the gateway.
openstack subnet create --subnet-range 130.166.84.0/24 --gateway 130.166.84.11 --no-dhcp --allocation-pool start=130.166.84.29,end=130.166.84.69 --network public public-main
Incus networks:
openstack network create --external --provider-network-type flat --provider-physical-network incus --share incus
openstack subnet create --subnet-range 10.88.0.0/24 --gateway 10.88.0.1 --network incus incus-main
Okay, and then back to Incus subnet: It looks like Networkmanager isn’t actually not managing the interfaces I asked it not to manage. I think what is happening is that I have two [keyfile] sections in two seperate files in my NetworkManger.conf.d, and NetworkManager is only actually reading one of them. But even after this is fixed, floating ip’s still don’t work on the Incus network.
Glance
Firstly, I think the 2Gi default pvc it gets for images is too small. I will probably have more than that.
Secondly, when I attempt to upload an image via horizon it just sits there on pending forever instead of uploading. But I think I came across the solution here.
Right, don’t do that. It drastically slows down provisioning time because glance has to convert the image from qcow to raw and import back into glance on-demand, and it uses the local disk and memory of the compute host the VM is launched on, to do that.
Also, it looks like copy on write snapshots with ceph only work with raw images as well.
:/
So I convert the image into a img using qemu-img and it turns out to be a 3 gb image uncompressed, even though the qcow was 415 mb compressed. So maybe openstack reads the first bit and then dies because glance doesn’t have enough storage.
But even when I attempt to load up a small alpine image, I get other errors:
Error: Unable to retrieve the images.
Error: Unable to get the Glance service version.
It could also be because the glance endpoint is not being exposed publicly, even though that might be what is expected of the service. This was caused by a typo, I put “images” instead of “image” which was what was expected in the endpoints config.
After fixing this, and exposing glance with TLS, I am able to upload an image using the openstack cli.
openstack image create --disk-format raw --file nocloud_alpine-3.22.2-x86_64-bios-tiny-r0.img alpine2 --verbose
But the GUI still does not work, and stays on pending forever. I see an error in the glance service:
OSError: unable to receive chunked part
This appears to be a known issue, where the solution is to increase the number of uwsgi worker threads. I increased to 2, then 4, then 40, and then 80 with no luck. :/.
I take a look at what Atmosphere, a deployment tool for helm is doing. It looks like there exist uwsgi options related to chunked input.
After setting a uwsgi config of:
glance_api_uwsgi:
  uwsgi:
    chunked-input-limit: "4096000"
    http-auto-chunked: true
    http-raw-body: true
    socket-timeout: 10
Uploading via the UI works now. For the alpine image. But for the debian image (3.2 gigabytes), I get “Request Entity Too Large”. This issue happens when an HTTP server cannot handle the size of a POST request sent to it. To fix a similar issue with Incus. I suspect this issue is the Apache httpd in front of openstack Horizon having a limit.
For example, the default is 1 GB. Since this requires auth, I will just extract the interesting parts:
A new default for the LimitRequestBody directive in httpd configuration
On systems where the value of LimitRequestBody is not explicitly specified in an httpd configuration file, updating the httpd package will set LimitRequestBody to the new default value of 1 GiB. As a consequence, if the total size of the HTTP request body exceeds this new 1 GiB default limit, httpd will return the 413 Request Entity Too Large error code.
This new default is to fix this CVE, which I am not affected on becasue I am on 2.4.58 instead of the affected 2.4.53.
After setting LimitRequestBody 0, it works and I can upload larger images from the UI. It looks like atmosphere’s openstack helm doesn’t have this, because the default apache2 version they use in their container, docker.io/openstackhelm/horizon:stein-ubuntu_bionic, is older than the patch.
root@9971ffb9219b:/var/lib/python# apache2 -v
Server version: Apache/2.4.29 (Ubuntu)
Server built:   2020-08-12T21:33:25
Rabbitmq
Rabbitmq updated, but it looks like the database schema didn’t upgrade alongside it. Because rabbitmq doesn’t store any truly persistent data, I decided to nuke it and then redeploy openstack services in place.
kubectl delete -f infra/rabbitmq
kubectl delete pvc -n openstack rabbitmq-data-rabbitmq-rabbitmq-0
flux reconcile helmrelease -n openstack --force keystone
and then repeat for other services.
One thing that fails is cinder and nova, because the ceph config is broken for some reason.
apiVersion: v1
data:
  ceph.conf: |
    [global]
    mon_host = will be discovered
kind: ConfigMap
metadata:
  name: ceph-etc
  namespace: openstack
  resourceVersion: "34776760"
  uid: cbc817ba-fe41-4afd-a035-1f63b2acc7d4
The eventual solution to this issue is to delete the ceph-adapter-rook helmrelease, reapply it. This fixes the configmap and puts the actual ip address in there, and I can reconcile the cinder and nova services.
MariaDB
I got this error:
Either correct the problem (if it’s, for example, out of memory error) and restart, or │ │ delete tc log and start server with –tc-heuristic-recover={commit|rollback}
To fix, I edited the statefulset that the container was part of, replacing the start command with sleep infinity (to prevent crashloopbackoff). Then I deleted /var/lib/mysqld/tc.log, and then I ran mysqld --wsrep-cluster-address="gcomm://" --tc-heuristic-recover=rollback
After this, ran flux reconcile helmrelease -n openstack --force mariadb to reinstall mariadb and reset the statefulset.
Cleanup
Here are the commands I use to cleanup after doing a deploy.
kubectl delete -f apps/
Delete the OVN bridge from Incus’s networks
In the openvswitch pod:
ovs-vsctl del-br br-int and then repeat for br-tun and br-ex
kubectl delete -f infra/
kubectl delete -n openstack jobs.batch --all
kubectl delete configmaps -n openstack mariadb-mariadb-state
kubectl delete secrets -n openstack pvc-ceph-client-key keystone-fernet-keys keystone-credential-keys
kubectl delete pvc -n openstack --all
And then on the compute node, I needed to:
rm -rf /run/libvirt
rm -rf /etc/libvirt
If this isn’t done, then the nova-compute-default pod fails to start.
rm -rf /run/openvswitch Maybe?
Notes for iteration two
I will eventually tear down everything and rebuild it. Some of the stuff is not worth changing right now, but when I do a rebuild I may end up making these changes.
Here’s some minor stuff on the more nitpicky side:
Have my Identity Management/Provider be hosted on idp.domainname, instead of sso.moonpiedumpl.ing- Done!
- Have secrets be set up in such a way that people can copy the configs with minimal effort.
- Use more than one kustomization instead of one big one
- I edited the file that says “do not edit”
- Kustomizations would let me do variable substitutions from secrets, allowing me to have things like the database password be private, but the url be public. Currently, I hide the entire database url (it includes the password).
- Move to endpointslices instead of endpoints
- Authentik with free tier of https://www.smtp2go.com/ in order to send password reset links.
One thing I am considering is using Zitadel instead of authentik, because Zitadel supports actions which are arbitrary scripts and probably cleaner to do than hacking an authentik policy to do api calls and requests.
But, Zitadel doesn’t seem to supply something akin to authentik blueprints. Also, it seems to be more designed for developers
Cloud Native Postgres is an operator that deploys postgres that is capable of automatically handling major version upgrades, which would let me dodge the issue I encountered with Authentik’s database upgrade. Although I don’t know if it’s truly automatic, given that it explicitly mentions that this happens if you mention a version number.
During a redeploy, I could either create multiple postgres “clusters” (I would still only be on a single node), or one big one with multiple dataabases.
Renovate or a similar software could automatically handle updating version tags, like those of helm charts or the postgres databases mentioned above.
Lstio is a service mesh and ingress alternative, and the feature I am interested in is mTLS encryption of trafffic between pods in the cluster. Given the way that I give people access to the inside of the kubernetes cluster via Coder containers, it’s worth investigating security measures like this, even if it requires more privileges than Coder users should have access to.
Lstio also offers a Gateway API which is the new hotness that will be replacing the Ingress controller in the future.
Another thing I can consider, is given my issues with load balancers and klipper-lb above, I could set up a real or virtual router to put my kubernetes behind, and have use MetalLB or some other solution that wants me to manage the network instead.
Also, I would probably rather use Cilium or Calico instead of RKE2’s combo of Flannel and Calico. I would want an eBPF data plane, and then I could use Cilium or Calico as host firewalls for blocking ssh and the kube api.
Other things to consider are options for improving security.
- Kube Api and ssh behind the firewall, requiring me to VPN into the server to access those services.
- Cilium or calico host based firewall
- Some form of login banner/warning banner. If I’m going to be essentially becoming my own hosting provider/infra, it makes sense to have the legal protections in place.s
Openstack instead of Incus. Incus is really good, but there are so many papercuts and issues when using it that are frustrating. I originally wanted Openstack because it was a whole “cloud” and had features like s3, databases as a service, firewall as a service, containers as a service, etc. But on the reddit, people are frustrated with those services as they aren’t maintained and truly reliable the way that the core openstack set of components is — for example, zun (containers) was deprecated and then undeprecated.
Despite that, the core Openstack components are extremely mature, with bugs ironed out, and features that Incus is lacking like the ability to create more complex networks via the UI. I totally understand why, as there isn’t really a reason to deploy pfsense when Incus’s ACL’s and build in monitoring can cover that use case in the real world, but for an educational use case it’s nice for people to be able to deploy virtual firewalls.
My big concern is attempting to get ceph on a single node. Instead of using openstack helm, I am thinking of using Openstack Operators (which are actually the upstream of Red Hat Openstack on Kube although they don’t tell you). However, it seems to be much simpler with Red Hat Openshift than if I were to deploy without it, and perhaps it’s not even possible to deploy on a non-openshift platform.
But after investigating, it does look pretty gitops-able, where I should be able to take the data from the config direcotry and deploy that using GitOps. It also looks like I can select abitrary storage classes, instead of being locked to ceph. One disadvantage is that these operators don’t seem to support as many services as Openstack Helm, like there is no support for Zun or skyline.
Another operatore option is yaook, but also no support for Zun or Skyline. Also, one reddit user says that updating the operator is painful. I’ll probably go with Red Hat’s offering, if it works.
https://github.com/openstack-gitops/rhoso-gitops. Huh. Officially developed Openstack on ArgoCD.
Another thing worth looking at is genestack, where they managed to get longhorn support with openstack-helm, but I could not figure out how they did it.
Another option is Suse Harvester… but they only officially support an ISO install. But I can find people unofficially nabbing the helm charts into their gitops:
- https://github.com/chifu1234/flux/blob/9ad745fbb9924c318a27c641d81b71478d46f72d/apps/base/harvester/release.yaml#L13
- https://github.com/remikeat/cluster/blob/3754e93b7d242ab384dac68e4206565e8ed9d6a5/argocd/vm/harvester/application.yaml#L4
Harvester does have a development mode install, which documents using helm to install it.
I would have to deploy Rancher with the harvester UI extension.
Argo instead of Flux: Probably not. But I am considering changing the way flux is deployed, like using the flux operator instead.
One thing I really, really want to do is get my own ASN and become my own hosting platform. But this is a far future type thing.
Instead of installing helm releases to their own namespace, I should install them all to the flux-system namespace, and use the targetnamespace feature. TThis would allow me to put all my secrets in the flux-system namespace. This would allow me to avoid replicating the sops key to every single namespace, as flux sops decryption of secrets does not cross namespaces.
No wait, in hindsight, this does not work becasue helm releases try to reference secrets, and these can only be referenced from the same namespace.
Incident: Outage
I was informed by a user of my services, that Incus has been taken slow to load, and generally broken. It was when I attempted to ssh into the server, and my connection was booted, that I became concerned.
My first theory was that it was a DDOS attack of some kind.
19.1Mb 38.1Mb 57.2Mb 76.3Mb 95.4Mb
└─────────────────────────────────────────────┴──────────────────────────────────────────────┴──────────────────────────────────────────────┴──────────────────────────────────────────────┴──────────────────────────────────────────────
130.166.79.34 => images.linuxcontainers.org 0b 534Kb 245Kb
<= 0b 0b 0b
130.166.79.34 => 172.56.243.240 638Kb 185Kb 108Kb
<= 0b 0b 0b
130.166.79.34 => cdn-185-199-109-154.github.com 73.0Kb 58.4Kb 145Kb
<= 0b 0b 0b
130.166.79.34 => 130.166.105.7 0b 170b 446b
<= 0b 0b 0b
130.166.79.234 => ec2-18-144-3-89.us-west-1.compute.amazonaws.com 0b 109b 27b
<= 0b 0b 0b
130.166.79.34 => ec2-18-144-3-89.us-west-1.compute.amazonaws.com 0b 109b 27b
<= 0b 0b 0b
130.166.79.234 => ec2-35-91-81-30.us-west-2.compute.amazonaws.com 0b 54b 41b
<= 0b 0b 0b
130.166.79.34 => ec2-35-91-81-30.us-west-2.compute.amazonaws.com 0b 54b 41b
<= 0b 0b 0b
130.166.79.34 => ec2-52-81-34-218.cn-north-1.compute.amazonaws.com.cn 0b 54b 14b
<= 0b 0b 0b
130.166.79.35 => ec2-52-81-34-218.cn-north-1.compute.amazonaws.com.cn 0b 54b 14b
<= 0b 0b 0b
130.166.79.34 => ec2-52-81-249-152.cn-north-1.compute.amazonaws.com.cn 0b 54b 14b
<= 0b 0b 0b
130.166.79.35 => ec2-52-81-249-152.cn-north-1.compute.amazonaws.com.cn 0b 54b 14b
<= 0b 0b 0b
130.166.79.34 => ec2-35-92-1-89.us-west-2.compute.amazonaws.com 0b 0b 54b
<= 0b 0b 0b
130.166.79.34 => lb-140-82-116-34-sea.github.com 0b 0b 42b
<= 0b 0b 0b
130.166.79.234 => ec2-35-92-1-89.us-west-2.compute.amazonaws.com 0b 0b 41b
<= 0b 0b 0b
130.166.79.234 => ec2-35-89-225-142.us-west-2.compute.amazonaws.com 0b 0b 41b
<= 0b 0b 0b
130.166.79.34 => ec2-35-89-225-142.us-west-2.compute.amazonaws.com 0b 0b 41b
<= 0b 0b 0b
130.166.79.234 => ec2-54-67-69-159.us-west-1.compute.amazonaws.com 0b 0b 41b
<= 0b 0b 0b
130.166.79.34 => ec2-54-67-69-159.us-west-1.compute.amazonaws.com 0b 0b 41b
<= 0b 0b 0b
130.166.79.234 => ec2-35-94-27-60.us-west-2.compute.amazonaws.com 0b 0b 27b
<= 0b 0b 0b
130.166.79.234 => ec2-3-101-22-123.us-west-1.compute.amazonaws.com 0b 0b 27b
<= 0b 0b 0b
130.166.79.34 => ec2-35-94-27-60.us-west-2.compute.amazonaws.com 0b 0b 27b
<= 0b 0b 0b
130.166.79.234 => ec2-13-57-210-23.us-west-1.compute.amazonaws.com 0b 0b 27b
<= 0b 0b 0b
130.166.79.34 => ec2-3-101-22-123.us-west-1.compute.amazonaws.com 0b 0b 27b
<= 0b 0b 0b
130.166.79.234 => ec2-35-88-121-77.us-west-2.compute.amazonaws.com 0b 0b 27b
<= 0b 0b 0b
130.166.79.34 => 52.82.36.134 0b 0b 27b
<= 0bThis is the result of iftop, which shows network traffic. Most of these seem to be scraper bots of some kind, and they are eating up my traffic.
I deployed anubis to my forgejo service, to avoid overconsumption of CPU, but I neglected another problem: With a total of only 200 mb/s, it could easily get saturated, even by simpler requests.
Here is an example domain that affected me: azpdegt2l5yb.stretchoid.com. This site, stretchoid, is as port scanning service, that scans websites for vulnerabilities. And they are eating up all my bandwidth, in what is essentially a ddos attack. Similarly, scan-13f.shadowserver.org belongs to a port scanning as a service platform.
Although I thought I was being clever with my bonding setup, the problem with it, is that even though I get more performance out of it, it becomes possible to saturate both network interfaces via enough connections. If I was using a seperate “management” interface, that was not exposed publicly except for ssh, then it could not get saturated, enabling me to reliably connect.
Another unlucky thing: This happened exactly when I went back to San Diego. I am not currently physically with my server to handle things if I want to take it truly offline.
The temporary mitigation I have implemented to ensure continued remote access (albeit, at the cost of uptime):
- Taking my services offline (just stopping the systemd services)
- Pointing moonpiedumpl.ing to 1.1.1.1 instead of my original domain
- This does not seem to have stopped the scanners though
After my services have been offline for a while, the traffic seems to have slowed. Although iftop still reports many connections, I’m not seeing a constant 90 mbit/s all the time.
Possible temporary solutions (which keep my services online):
- Change my mac address (in order to get a different one from DHCP)
- This may not work if they are scanning domains
- This may not work if they are scanning the whole internet, and just happened to find me. If they can find me once, they can find me again.
- Change my domain
- Yeah. Same thing as above. Perhaps changing my domain, along with my ip address will let me keep my service up.
Possible long term solutions:
- Ip based blocklists
- Something like crowdsec could block ip addresses… although I’m worried they
- Cloudfare
- Maybe one of the cloudfare ingress controllers:
- VPS + Reverse Proxy (+ WAF?)
- Something like pangolin
Okay, I will say that I have been forced to change my ip address, because I moved from one dorm to another. So now, I am debating if I should change my domain or not. I think I will change it and keep the new one secret, using variables like
One thing I think would be cool would are letsencrypt’s ip address based certificates, but I think Coder needs subdomains in order to work, and I can’t have a subdomain on an ip address. But with something like this, I could just move my ip address and keep going.
I could also consider just… not changing my domain. This service needs to be up by tomorrow, which is not a lot of time. But if I do so, then I risk exposing my new IP address and domain.
In order to test this, I connected my laptop (so I got a different IP address) and pointed my domain to my laptop. Although I see a lot of port scans, I don’t see any major usage of traffic. I suspect that attempts to pop open forgejo, in combination with Incus doing something like Image pulling, ate up all my traffic. I think I’m just going to put this online as is, and if I see too much traffic, I can put the entirity of forgejo behind a login wall.
However, after putting my server back up, I see Incus eating up around 80-90 mbit/s of bandwidth. The connection is to images.linuxcontainers.org, which is where the images are stored. Apparently, Incus auto updating cached images was eating up all my network. Thankfully, I can disable the feature.
So it’s not quite a DDOS. But I was able to access the server while forgejo was offline, even with that high bandwidth usage, so I think it was a double whammy, and a combination of the two resulted in a much worse problem.
I saw almost no traffic, but when I put forgejo online again, I saw a lot more traffic and port scanners. Not DDOS, but I guess it was enough to fill up my network when combined with Incus. The way bonding works, is that the it doesn’t split a single connection, so individual connections are limited. Hence why it’s a “Distributed” Denial of Service, instead of a just a normal machine.
New Dorm
Except, I’m not quite sure there is no issue. Despite seeing no network traffic from Incus or scanners on forgejo, the server still suffered from intermittment connections. But, apparently the new building I am, has bad wiring and issues, according to someone else who was previously here. In addition to that, my dorm has the wifi router. My guess is what is happening is that despite having 100 mbit/s connection limits on all cables, the switch behind everything (or something further up the chain), cannot actualloy handle all that traffic. I’m reminded of a blog post I recently read about cpu limits on kubernetes, where they note that setting a CPU limit does not actually guarantee that pods will get access to that level of CPU. Instead, requests are needed, which actually does do the work to figure out a setup where all pods get the cpu they request.
And it’s really bad.
I switched to mosh, and despite no traffic running through my server except ssh, I see this:
`mosh: Last contact 1:00 ago. [To quit: Ctrl-^ .]
Eventually it reconnects. But this is really annoying. And for users, it must be extra annoying. But first, I need to ensure that both my ethernet interfaces in the bond are actually being used.

```{.default}
moonpie@thoth:~$ sudo cat /proc/net/bonding/bond0
Ethernet Channel Bonding Driver: v6.1.0-38-amd64

Bonding Mode: adaptive load balancing
Primary Slave: None
Currently Active Slave: enp9s0
MII Status: up
MII Polling Interval (ms): 100
Up Delay (ms): 0
Down Delay (ms): 0
Peer Notification Delay (ms): 0

Slave Interface: enp0s25
MII Status: up
Speed: 100 Mbps
Duplex: full
Link Failure Count: 1
Permanent HW addr: 48:4d:7e:ec:54:2f
Slave queue ID: 0

Slave Interface: enp9s0
MII Status: up
Speed: 100 Mbps
Duplex: full
Link Failure Count: 0
Permanent HW addr: 48:4d:7e:ec:54:31
Slave queue ID: 0
The Link Failure Count: 1 is probably due to me unplugging it to plug my laptop in, but it did come back up again, which is a good sign.
root@thoth:~# ifstat -i enp9s0,enp0s25,eth0,bond0,internal0,public0
      enp9s0             enp0s25               eth0               bond0             internal0            public0
 KB/s in  KB/s out   KB/s in  KB/s out   KB/s in  KB/s out   KB/s in  KB/s out   KB/s in  KB/s out   KB/s in  KB/s out
    1.87      2.46      0.00      0.00      1.22      2.95      1.87      2.46      0.00      0.00      1.11      0.00
    1.16      1.62      0.00      0.00      0.76      2.33      1.16      1.62      0.00      0.00      0.67      0.00
    2.11      1.63      0.00      0.00      1.23      1.92      2.11      1.63      0.00      0.00      1.09      0.00
    1.81      1.65      0.00      0.00      1.31      2.33      1.81      1.65      0.00      0.00      1.21      0.00
    2.40      1.67      0.00      0.00      1.99      2.00      2.40      1.67      0.06      1.40      0.51      0.00
    1.16      1.71      0.00      0.00      0.82      2.00      1.16      1.71      0.00      0.00      0.58      0.00
    1.16      1.67      0.00      0.00      0.73      3.03      1.16      1.67      0.00      0.00      0.64      0.00
    1.00      1.66      0.00      0.00      0.73      1.84      1.00      1.66      0.05      0.00      0.63      0.00
    2.60      2.54      0.00      0.00      2.11      2.62      2.60      2.54      0.07      0.00      0.69      0.00
So it looks like despite having a bond, only one of my interfaces is actually used. Both say up though, but this probably contributes to not getting enough network speeds.
After a reboot, it works fine, however:
root@thoth:~# ifstat -i enp9s0,enp0s25,eth0,bond0,internal0,public0
      enp9s0             enp0s25               eth0               bond0             internal0            public0
 KB/s in  KB/s out   KB/s in  KB/s out   KB/s in  KB/s out   KB/s in  KB/s out   KB/s in  KB/s out   KB/s in  KB/s out
11989.63     52.37      1.37    124.69  11654.08    171.83  11989.74    177.06     39.22   1938.29      0.99      0.00
11946.43     49.93      1.87    138.25  11614.61    182.29  11948.30    188.25     38.44   1828.08      1.42      0.00
11959.60     45.93      1.56    145.35  11625.44    185.09  11959.90    191.29     35.43   1556.25      1.03      0.00
11922.62     42.51      1.62    151.77  11592.51    187.73  11928.02    194.21     32.27   1440.24      1.22      0.00
11848.59     35.80      1.25    160.06  11509.07    188.90  11847.45    195.96     25.35   1181.13      0.90      0.00
11854.63     40.43      1.62    145.73  11528.21    179.70  11858.91    186.06     30.50   1410.89      1.09      0.00
11926.80     45.38      1.12    145.14  11593.25    184.30  11925.13    190.51     34.03   1589.40      0.89      0.00
But, when I log in a few hours later:
root@thoth:~# ifstat -i enp9s0,enp0s25
      enp9s0             enp0s25
 KB/s in  KB/s out   KB/s in  KB/s out
    3.07      5.95      0.00      0.00
    2.01      2.97      0.00      0.00
   62.43      6.41      0.00      0.00
    1.82      3.16      0.00      0.00
    1.81      3.02      0.00      0.00
   21.44     11.37      0.00      0.00
   16.05      3.42      0.00      0.00
    1.11      0.06      0.00      0.00
    1.82      0.12      0.00      0.00
    1.10      0.06      0.00      0.00
    0.99      0.06      0.00      0.00
    0.94      0.06      0.00      0.00
   16.15      3.75      0.00      0.00
   27.99      6.11      0.00      0.00
10650.43    210.02      0.00      0.00
11952.08    213.10      0.00      0.00
11996.47    213.79      0.00      0.00
11987.28    208.43      0.00      0.00
 4684.25     75.68      0.00      0.00
    1.45      0.06      0.00      0.00
    3.79      0.06      0.00      0.00
    1.25      0.87      0.00      0.00
    3.04      0.30      0.00      0.00
    2.33      0.06      0.00      0.00
I also see repeated disconnections again. But what causes these disconnections?
Also, I suspect this issue may have happened previously, which is why I ran out of network when Incus was downloading images.
e1000e 0000:00:19.0 enp0s25: Detected Hardware Unit Hang:
  TDH                  <e0>
  TDT                  <1e>
  next_to_use          <1e>
  next_to_clean        <df>
buffer_info[next_to_clean]:
  time_stamp           <1002e4bf0>
  next_to_watch        <e0>
  jiffies              <10049d328>
  next_to_watch.status <0>
MAC Status             <80043>
PHY Status             <796d>
PHY 1000BASE-T Status  <0>
PHY Extended Status    <3000>
PCI Status             <10>
I see this error in the cockpit logs, probably from dmesg. However, although rebooting fixes the problem temporarily, I lose these logs. I think
Also, apparently the sober people dorms get 1g links up/down. I will do those next summer/year.
Outage 2: Electric Boogalo
I wake up and attempt to ssh in and I cannot ssh in. I also cannot kubectl anything, even though ingress-nginx appears to be up and I can access it — although everything 502’s.
So I reboot. And my server doesn’t come online. I plug in the monitor, and get no boot devices found. I try to add one in the bios and I get “no filesystems found”.
One likely cause for this issue is the the EFI partition is full. To fix this,
Boot from a live ISO.
Chroot in to the existing debian install
Mount partitions in the chroot
Delete the cruft from the partition.
Update the system and reinstall kernels and the bootloader.
Well I try to boot and it doesn’t even find the SSD. So I take out the SSD and use a USB adapter, and it doesn’t show up there.
Actually, it does show up, as SATAFIRM 11, which is an error code indicating a firmware issue. This issue seems to be unfixable, based on some basic research. Even recovery seems to be difficult, because the issue exists at a lower level.
But anyway. The new SSD I bought shows up fine. I also bought a new 4TB hard drive, because I don’t trust the existing one.
But I repeat the bridge/bond and now I’m back with a fresh install.
Update to Debian Trixie
I have reinstalled and I am on Debian trixie. I am documented the steps of what i need on the host.
open-iscsi, iptables (actually the wrapper for nftables)
additional (meaning, keep non-free-firmware enabled) enabled repos: non-free, contrib, backports
Another annoying error I get is: Failed to allocate manager object: Too many open files
It seems like when there is a limit on the maximum number of file descriptors, so I increased that.
/etc/security/limits.conf
*    soft    nofile    65536
*    hard    nofile    65536
Outage 3: The Re-Up
So my server went down again. Great. I force powered it off and then rebooted and it went up again (Great!), but all the kubernetes services are down. Not so great.
When I log in and see why they are down, I see this issue:
Events:
  Type     Reason              Age                   From                     Message
  ----     ------              ----                  ----                     -------
  Warning  FailedAttachVolume  2m44s (x246 over 8h)  attachdetach-controller  AttachVolume.Attach failed for volume "pvc-31e
c4c7c-45d1-4328-a347-ace8c43a887a" : rpc error: code = Aborted desc = volume pvc-31ec4c7c-45d1-4328-a347-ace8c43a887a is not
 ready for workloads
I see something similar in the kubectl describe for all pods that use a pvc. When I go to the logs for longhorn-manager, I see this:
time="2026-04-16T21:43:44.281051325Z" level=info msg="All replicas are failed, set engine salvageRequested to true" func="co
time="2026-04-16T21:43:44.281132605Z" level=info msg="All replicas are failed, auto-salvaging volume" func="controller.(*Vol
time="2026-04-16T21:43:44.281184673Z" level=info msg="Bringing up 0 replicas for auto-salvage" func="controller.(*VolumeCont
time="2026-04-16T21:43:44.282575199Z" level=info msg="All replicas are failed, set engine salvageRequested to true" func="co
time="2026-04-16T21:43:44.282655965Z" level=info msg="All replicas are failed, auto-salvaging volume" func="controller.(*Vol
time="2026-04-16T21:43:44.282708484Z" level=info msg="Bringing up 0 replicas for auto-salvage" func="controller.(*VolumeCont
time="2026-04-16T21:43:44.284606008Z" level=info msg="All replicas are failed, set engine salvageRequested to true" func="co
time="2026-04-16T21:43:44.284684114Z" level=info msg="All replicas are failed, auto-salvaging volume" func="controller.(*Vol
time="2026-04-16T21:43:44.284734689Z" level=info msg="Bringing up 0 replicas for auto-salvage" func="controller.(*VolumeCont
time="2026-04-16T21:43:44.287244064Z" level=info msg="All replicas are failed, set engine salvageRequested to true" func="co
time="2026-04-16T21:43:44.287313383Z" level=info msg="All replicas are failed, auto-salvaging volume" func="controller.(*Vol
time="2026-04-16T21:43:44.287362314Z" level=info msg="Bringing up 0 replicas for auto-salvage" func="controller.(*VolumeCont
So, I think I have two options:
- Figure out how to salvage volumes
- Restore postgres instances from the daily snapshots I was taking
Okay, it looks like the issue is that, since longhorn is not running replicated, it doesn’t have anything healthy to compare to after a hard shutdown. I am going to just nuke all volumes (thank gitops) and restore postgres databases from snapshots.
After attempting to restore from a snapshot:
Events:
  Type     Reason            Age   From               Message
  ----     ------            ----  ----               -------
  Warning  FailedScheduling  72s   default-scheduler  0/1 nodes are available: pod has unbound immediate PersistentVolumeClaims. preemption: 0/1 nodes are available: 1 Preemption is not helpful for scheduling.
The volume says:
Events:
  Type     Reason                Age                From                                                                                      Message
  ----     ------                ----               ----                                                                                      -------
  Warning  ProvisioningFailed    12s (x2 over 16s)  driver.longhorn.io_csi-provisioner-5d498c6944-z7g7w_09917d37-ccc4-4eeb-8b86-70de939621a7  failed to provision volume with StorageClass "longhorn-databases": rpc error: code = Internal desc = Bad response statusCode [404]. Status [404 Not Found]. Body: [message=failed to create volume: unable to create volume pvc-035e1b7a-446e-471e-98ba-55af0079b218: failed to verify data source: volume.longhorn.io "pvc-d622ae84-04c5-4877-82c5-14ea76ea0d23" not found, code=Not Found, detail=] from [http://longhorn-backend:9500/v1/volumes]
  Normal   ExternalProvisioning  4s (x2 over 16s)   persistentvolume-controller                                                               Waiting for a volume to be created either by the external provisioner 'driver.longhorn.io' or manually by the system administrator. If volume creation is delayed, please verify that the provisioner is running and correctly registered.
  Normal   Provisioning          0s (x5 over 16s)   driver.longhorn.io_csi-provisioner-5d498c6944-z7g7w_09917d37-ccc4-4eeb-8b86-70de939621a7  External provisioner is provisioning volume for claim "openfga/openfga-postgres-1"
  Warning  ProvisioningFailed    0s (x3 over 15s)   driver.longhorn.io_csi-provisioner-5d498c6944-z7g7w_09917d37-ccc4-4eeb-8b86-70de939621a7  failed to provision volume with StorageClass "longhorn-databases": rpc error: code = Internal desc = Bad response statusCode [404]. Status [404 Not Found]. Body: [code=Not Found, detail=, message=failed to create volume: unable to create volume pvc-035e1b7a-446e-471e-98ba-55af0079b218: failed to verify data source: volume.longhorn.io "pvc-d622ae84-04c5-4877-82c5-14ea76ea0d23" not found] from [http://longhorn-backend:9500/v1/volumes]
Okay, it’s back up again. I just had to wait. It took a while, I think it was due to having a single node.